Trimming
Changing the length of clips or gaps on the timeline is called ‘trimming’.
Prepare to trim the beginning of a clip (the ‘mark-in’ point) by clicking at the left-hand edge of the clip while the trim pointer is visible. With a trim point thus established, you can add or remove frames from the beginning of the clip.
To trim on the clip, drag the trim point to the left or right.
To trim on the Player, use the trim buttons to trim one or ten frames either forwards or backwards. Click the loop play button for a looping preview of the trim region.
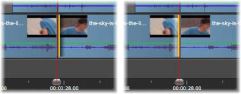
The position of the playhead relative to the trim point helps distinguish the in-point of a clip (left) from the out-point of the previous clip (right).
To trim the end of the clip (or ‘mark-out’ point), open a trim point by clicking at the right-hand edge of a clip when the mouse pointer changes to a rightward-pointing arrow. Now you can add or remove frames from the end of your clip.
Once again you can trim directly on the clip by dragging the trim point, or on the Player while it remains in trim mode.
The project’s timeline lets you trim not just the clips upon it but also the gaps between them. Trimming gaps might not sound terribly useful at first, but is in fact handy. For instance, the easiest way to insert or delete space on a single timeline track is to trim the right- hand edge of a gap. All clips to the right of the gap are shifted as a block when this is done.
Also, when you need to open a trim point on each track in order to maintain synchronization while trimming, you may often choose to trim the duration of a gap rather than that of a clip. (Remember the rule: one trim point on every track is required for keeping in sync.)
Trimming a gap, whether at the start or the end, is accomplished in exactly the same way described above for trimming a clip.
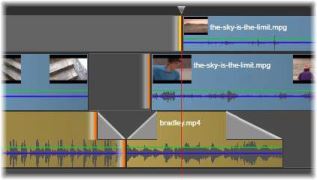
Two gaps and an audio out point have been selected for trimming. Because one trip point has been created on each track, the entire production stays in sync when trimmed.
In this operation, two adjacent clips (or a clip and an adjacent gap) are trimmed simultaneously. Any frames added to the left-hand item are taken away from the one on the right, and vice versa, as long as space and material are available. All you are moving is the cut-point where the items meet. One application for this technique is adjusting visual cuts to the beat of a music soundtrack.
To start, click at the end of the left-hand clip to open the first trim point, then Ctrl-click at the beginning of the right-hand clip to open the second.
When positioned over the adjacent trim points you just opened, the mouse pointer should be a horizontal two-headed arrow. Drag left or right to move the clip boundary, or use the Player in trim mode.
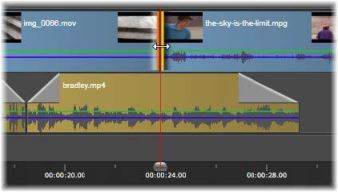
Trim both: Adjacent out and in trim points have been selected. Dragging the trim points affects the timing of the hand-off from the outgoing clip to the incoming one, but does not disrupt the timeline.
Over-trimming occurs when you try to extend the duration of a clip beyond the limits of its source material, a situation you typically want to avoid.
Notice that if you have over-trimmed your clip the invalid parts are shown in pink.
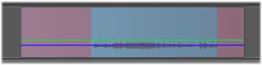
Overtrimmed clip: The first and last frames will be frozen in the over-trimmed sections.
Over-trimming is not a crisis situation. You do not need to take action immediately. Pinnacle Studio will simply extend the clip as specified by ‘freezing’ the first and last frames of the clip into the over-trimmed areas.
Depending on the duration of the over-trim, and the context, this simple approach may be all you need. A brief freeze-frame can even be visually effective in its own right.
The freeze-frame method will probably not give satisfactory results if it happens during a sequence involving rapid motion, however. In such exacting cases you might consider supplementing or replacing the clip, or prolonging it by changing the speed. (See “Controlling speed with Time Remapping” on page 64.)
To move a selection of one or more clips, place the mouse pointer on any selected clip and watch for it to change to a hand symbol. When it does, start dragging the clip to the desired position.
Move can be thought of as a two-step process. First, the selection is deleted from the current timeline, according to the rules of the current edit mode. Second, the selection is moved to the desired end position, where it is inserted in a left-to-right fashion per track. The relative position of all selected clips on all tracks is retained.
Moving a ‘sparse selection’ (a selection in which some clips per track are selected while others in the same region are not) is possible, but may be confusing unless executed in overwrite mode. Moving either single clips or a complete timeline cross-section is more straightforward and should be preferred when possible.
Holding down the Alt key while moving clips allows you to toggle between insert and overwrite modes. Standard smart operation is the same as insert, since the most frequent use of horizontal moves is to reorder the playback sequence.
Copying clips: Holding down the Ctrl key while moving a selection of clips will copy the clips instead of moving them.