Correcting video
When you select a video clip and choose Corrections in the Editor panel, you can choose from the following correction categories: Adjustments, Snapshot, Stabilize, and Wide-angle Lens Correction.
During import, Studio automatically detects certain parameters, but a variety of factors can lead to the occasional incorrect identification. Adjustments allows any of these basic image properties to be changed, if needed.
Alpha
If your video has an Alpha channel and you wish to remove it, choose the Ignore Alpha option.
Aspect ratio
If the aspect ratio of a video asset was not recognized correctly on import, or if the frame proportions must be manually changed for another reason, use this dropdown menu to select the desired setting. The adjustment does not change the amount of the image on display. Instead, visible area is stretched (or shrunk) independently in width and height to make it fit the desired frame boundaries.
Interlacing
If the Interlacing options on the image were misidentified on import, use this dropdown to impose the correct setting.
Stereoscopic 3D
If the format of a 3D image file was wrongly identified on import, set the correct stereoscopic layout with this dropdown list.
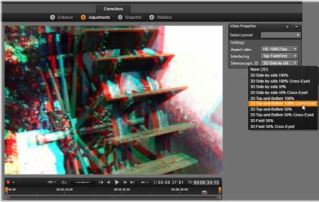
Correcting the stereoscopic 3D properties of a Library asset.
The snapshot tool enables you to acquire a single frame from a video, crop it, and save it as a photo. Its controls are similar to those for the Crop correction for photos.
Aspect Ratio: The frame for selecting an image cutout can be resized by grabbing its sides and corners, or dragged within the preview by grabbing it in the center.
Preview: Preview shows the selected cropped image without the snapshot tools. Press Esc or click once on the image to view the tools again.
Save image: This command exports the cropped image as a JPEG file, and switches off the snapshot editing mode in the preview. Snapshots are stored in the library under My Pictures > Images. Locate the new item by returning to the Library and clicking the special find added item button that is displayed temporarily on the Library footer bar. The new media file itself is created in:
[Registered User]\My Documents\My Pictures\Images
Clear Selection: Sets the selection frame back to its original setting (whole image).