Look settings
The Settings panel provides access to the Look Settings, where you can examine, modify, add or delete the individual detail layers that are overlaid to generate a particular Look.
There are three types of detail layer: face (surface), edge and shadow. The three types differ not in the settings they support, but in the default position at which they will be inserted in the layer stack. Unless explicitly dragged out of position, face details always appear at the top of the stack, followed by edges, and finally shadows. After a detail has been created, however, it can be dragged up or down in the layer stack as desired.
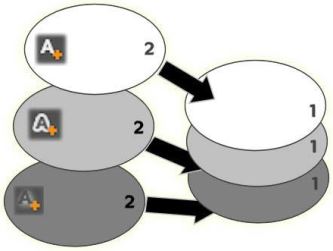
Face, Edge and Shadow: A new face detail (left, top) is added above the uppermost existing face layer; new edge and shadow details are added below the bottommost layer of their respective types.
The properties of individual detail layers can be modified by means of controls on collapsible s in the Looks Editor.
The following detail properties are available:
• Offset X, Offset Y: These sliders set the position of the detail layer relative to the nominal position of the text or graphic to which the Look is applied. The range of offset is -1.0 (left, or bottom) to +1.0 (right, or top). The maximum offsets represent one eighth the width and one eighth the height of the Player panel preview.
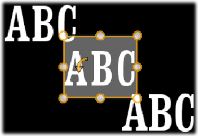
In this example, a Look with three detail layers has been applied to a single text layer. The detail layers are configured identically except for their offset values, as follows: top left (-1.0, 1.0); center (0, 0); bottom right (1.0, -1.0).
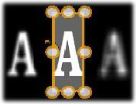
• Size: This slider sets the thickness of the segments used to draw the text or graphic, from zero to 2, where 1 represents the default thickness.

This example includes three detail layers with varying size values. From left to right: 0.90, 1.0, 1.20. The visual effect of varying the size depends on the default thickness of the strokes in the layer. In a text layer, this depends on the font family and size chosen.
• Blur: As this slider increases in value from 0 to 1, the detail layer affected becomes increasingly ghostly and indistinct.
The detail layers in this example differ only in their blur settings. From left to right: 0.15, 0, 0.40.
• Opacity: This slider sets the opacity of the detail layer from 0 (transparent) to 1 (opaque).
• Fill: Click the color swatch button to open a color picker in which the fill color of the detail layer can be set. The color picker includes an eyedropper button to pick up a color from anywhere in the Title Editor. To set a gradient background, choose the Gradients button at the top of the color palette. Additional gradient markers can be set by single-clicking below the gradient bar. Gradient markers can be removed by dragging them vertically out of the bar area.
In addition to setting the properties of existing detail layers, you can add details of any of the three types, delete details, and reorder the detail layer stack.
To add a detail layer, click one of the three small buttons at the top right of the Look Settings. From left to right, these create a new face, edge and shadow layer respectively. The placement of the new detail layer in the layer stack is determined by its type, as explained above.

To delete a detail layer, click the trashcan button in the header bar of the detail’s edit panel.
To rename a detail layer, double-click its name, type the name you want, and press Enter.
To temporarily hide a detail layer, click the dot-shaped visibility toggle icon in the detail’s header.
To close down or open up the edit panel of a detail layer, click the arrow button at the left-hand end its header bar.
To reorder detail layers, drag the header bar of the edit panel to its new location. If the Look you are editing contains more than two or three layers, it can be easier to follow the action if you close down the s first so that the whole stack is visible at once.