Motion Tracking
You can track the motion of elements in your videos and add masks or objects that follow the same motion. For example, you can apply a mask to obscure a face, license plate, or trademarked logo that is visible in your video.
You can also track the motion of an element so that you can follow it with a title or other object. For example, you can add a name label to follow a player in a video of a sporting event.
1 In the Edit workspace, select a video clip in the Timeline that you want to track, and do one of the following:
• On the timeline toolbar, click the Motion Tracking button  .
.
• Right-click the clip and choose Motion Tracking from the context menu.
2 In the Mask Object area of the Motion Tracking Editor, click a Shape icon.
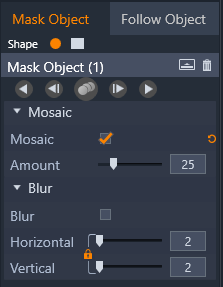
3 Drag in the preview window to apply the shape to the area that you want to cover. Fine-tune the mask by dragging the orange mask nodes
4 In the Mosaic or Blur area, choose the settings you want to apply to obscure the selected area.

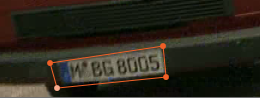
Mosaic effect (left). Blur effect (right)
5 Track the selected area of the video by clicking one of the following Analyze buttons  :
:
:• Track selected mask backward all frames — tracks the selected area backward from the current time point until it is not detected onscreen
• Track selected mask backward by 1 frame — tracks the selected area back one frame from the current time point. Good for short tracking segments that are not easily tracked.
• Track selected mask — tracks the selected area (back and forward of the current time point) until it is no longer detected onscreen
• Track selected mask forward by 1 frame — tracks the selected area forward by one frame from the current time point. Good for short tracking segments that are not easily tracked.
• Track selected mask forward all frames — tracks the selected area forward from the current time point until it is not detected onscreen.
6 Check the tracking analysis by playing the video using the navigation controls below the preview.
Pause the video if you notice points where the mask doesn’t fully cover the selected area, and readjust the nodes in the preview area. You can change the shape of the mask by clicking the orange mask outline to add a node (pointer displays a plus sign), or by clicking a node (selected node is white) and pressing Delete to remove the node.
7 Click OK when you are satisfied with the mask and to return to the Edit workspace.
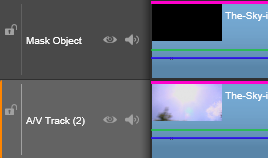
The Mask Object is added to the Timeline above the corresponding video.
1 In the Edit workspace, select a video clip in the Timeline that you want to track, and do one of the following:
• On the timeline toolbar, click the Motion Tracking button .
• Right-click the clip and choose Motion Tracking from the context menu.
2 Click the Follow Object tab.
3 In the Follow Object area, click the Tracker icon  .
.
4 In the preview area, click the element that you want to track. Choosing an area that has distinct color and contrast works best.
5 Track the selected element of the video by clicking one of the following Analyze buttons :
:• Track backward all frames — tracks the selected area backward from the current time point until it is not detected onscreen
• Track backward by 1 frame — tracks the selected area back one frame from the current time point. Good for short tracking segments that are not easily tracked.
• Track — tracks the selected area (back and forward of the current time point) until it is no longer detected onscreen
• Track forward by 1 frame — tracks the selected area forward by one frame from the current time point. Good for short tracking segments that are not easily tracked.
• Track forward all frames — tracks the selected area forward from the current time point until it is not detected onscreen.
6 Check the tracking analysis by playing the video using the navigation controls below the preview.
If the tracking is lost at any point, find the point where the tracker is lost, and reapply the tracker.
7 Drag the title or object that you want to apply to the tracking path to the drop zone (thumbnail area).
The title or object that you selected appears in the preview area.

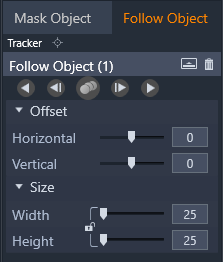
8 To adjust the position of the title or object, in the Offset area, adjust the Horizontal and Vertical settings.
9 To scale the title or object, drag the corner handle for the title or object in the preview area or in the Size area type Width and Height values.
10 Play the video to check the positioning of title or object.
11 Click OK when you are satisfied with the tracking to return to the Edit workspace.
A new track is inserted in the Timeline, above the tracked video.
Tips:
You can’t edit titles in the Motion Tracking editor, so It’s best to create and save a title in advance. This will let you see the text in the Motion Tracking context.
To delete a tracking object, right click the thumbnail in drop zone, and choose Delete.
To rename a tracking object, right click the thumbnail in the drop zone and choose Rename. Type the name you want.
To replace a tracking object, drag a new title or object to an existing thumbnail.