Pan-and-zoom
The pan-and-zoom tool is available for videos and images when they are opened from the timeline.
With pan-and-zoom, an area from within the image or video is used to fill the whole video frame. The area can be of any size and shape. On playback, it will be enlarged sufficiently to fill the video frame without empty areas.
If you define two or more areas, pan-and-zoom animates your presentation of the image by zooming in and out while traversing it with simulated camera movements as it moves smoothly from one area to another. You can also rotate while panning and zooming.
The pan-and-zoom tool utilizes the full available resolution so you will not forfeit detail by zooming in.
To apply pan-and-zoom to a selected clip on the timeline, in the timeline, right-click the image or video, and choose Pan-and-Zoom or in the Editor panel, click Pan-and-Zoom. The Player panel displays Pan & Zoom Source (left) and Pan & Zoom View (right). The selection frame can be set on the source side of the panel.
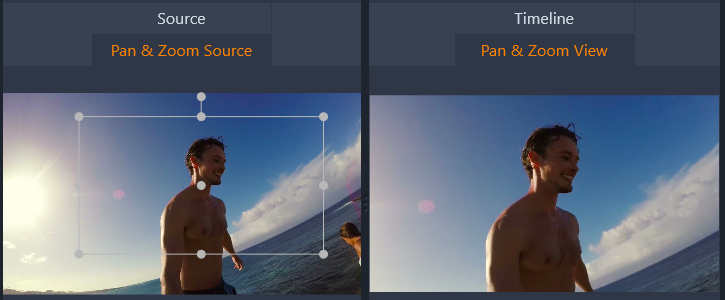
In this illustration the Pan-and-zoom tab has been selected and remains set to the default Static mode. The selection frame, defines a region of the image that will be magnified to fill the entire frame, as shown on the right.
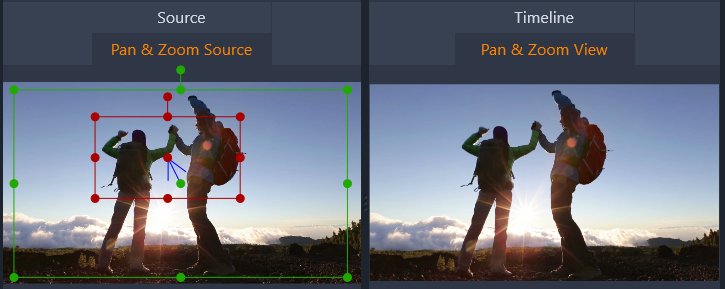
Pan-and-zoom has two alternative Edit Modes: Static and Animated. In the Static mode, a single unchanging image region is shown throughout duration of the clip. In the Animated mode, separate regions are defined for the first and last frame of the clip; on playback, a smooth ‘camera move’ from one to the other is shown. Animated mode also allows keyframing, in which any number of additional defined regions can be added to the pan-and-zoom camera path.
In Static mode, a gray selection frame with round control points is displayed over the image. You can enlarge, reduce, and move this frame, but you cannot change its proportions (aspect ratio). You can use the Source and Timeline windows in the Player panel to preview
The zoom and position can also be controlled numerically using sliders in the Editor panel. Double-click the sliders to reset the values, or single click to enter a numeric value.
When Animated mode is set, the image is automatically analyzed and an initial size and position both for the start and end is automatically set. The generated animation begins zoomed in slightly, then pulls back to the full size available. If an image has a different aspect ratio than the video frame, enough zoom is applied throughout to prevent blank areas from appearing.
To support the extra functionality of Animated mode, the color of the selection frame is used to indicate its place in the animated sequence. The start frame is green, and the end frame is red. Frames at any intermediate point are drawn in white.
When multiple frames are visible, you can drag the frames as needed by positioning your mouse over either the edge of the frame or the center dot. Moving the white frame will automatically add a keyframe at the current position.
With keyframing, you can create a customized pan-and-zoom animation of arbitrary complexity, though simple sequences of a few steps may be all you ever need.
Switch to Animated mode as described above, and note that two frames have been added to the preview. These special start and end keyframes, which as mentioned above are drawn in green and red respectively.
If you don’t require intermediate keyframes, positioning the start and end frames completes your session.
For a more complex animation, however, position the scrubber where a change of camera motion should occur. To create a new keyframe, simply set the white selection frame to the desired size and position. The new keyframe is represented by a lozenge-shaped gray icon in the keyframe line below the clip timeline and in the Editor panel. Adjust the selection frames interactively in the source view or use the controls in the Editor panel.
Add as many keyframes as necessary. Settings in the Editor panel are saved automatically.
For more information about keyframes, see Using keyframes.
The following controls are available for Pan-and-Zoom:
• Preset: Choose from a number of static and animated presets.
• Zoom, Horizontal, and Vertical display the numerical values of the current frame. Double-click the sliders to reset the values.
• Rotation lets you rotate the view from 0 to 360 degrees.
• Low pass filters out small-scale movements to achieve a smooth, optimized animation.
• Motion: Lets you choose from Ease In, Ease Out, Smooth, and Linear to determine the style of the movement. For example, Smooth provides a gentle braking when approaching a direction change in the keyframe animation path.