Correcting photos
Photo correction categories include Adjustments, Crop, Straighten, Red-Eye, and Wide-angle Lens Correction. For more information about Wide-angle Lens Correction, see Wide-angle Lens Correction.
During import, Studio automatically detects certain parameters, but a variety of factors can lead to the occasional incorrect identification. Adjustments allows any of these basic image properties to be changed, if needed.
Alpha
Your photo may have an Alpha channel, an 8-bit grayscale image plane that defines the transparency level of each pixel in your photo. If you wish to remove the alpha channel, choose the Ignore Alpha option.
Interlacing
If the Interlacing options on the image were misidentified on import, use this dropdown to impose the correct setting.
Stereoscopic 3D
If the format of a 3D image file was wrongly identified on import, set the correct stereoscopic layout with this dropdown list.
Use this tool to emphasize a specific section in an image, or to remove undesired components.
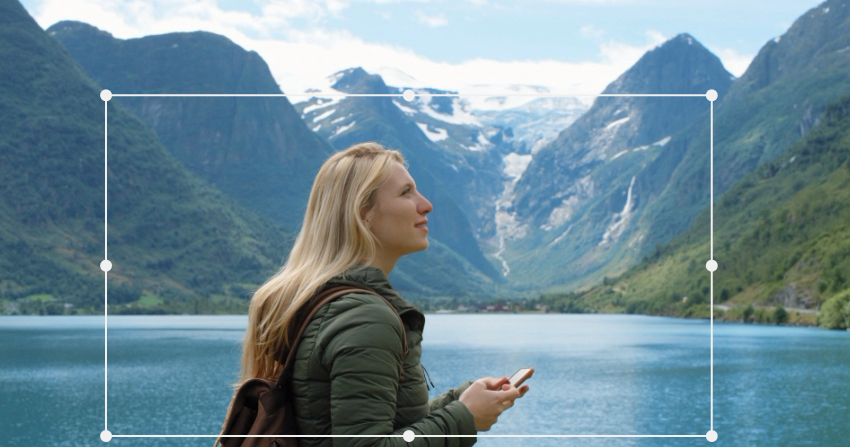
Cropping an image.
Aspect ratio: The Aspect ratio dropdown on the control bar can be use to ensure that the crop rectangle maintains a desired standard proportion while being resized. Standard (4:3) and wide (16:9) frame aspect ratios are supported.
After you select an aspect ratio, on the image preview, drag the sides and corners of the resizable bounding box, or drag the center of the bounding box to adjust its position.
Click Clear Selection to return to the original dimensions.
Click Save image to save the cropped version of the photo.
This correction enables you to straighten an image in which elements that should be exactly horizontal or vertical are visibly tilted. Unless you have cropped the image, it dynamically resizes as you rotate to keep the corners from being visibly cut off. With a cropped image, no resizing takes place as long as there is sufficient excess material to fill in the empty corners.
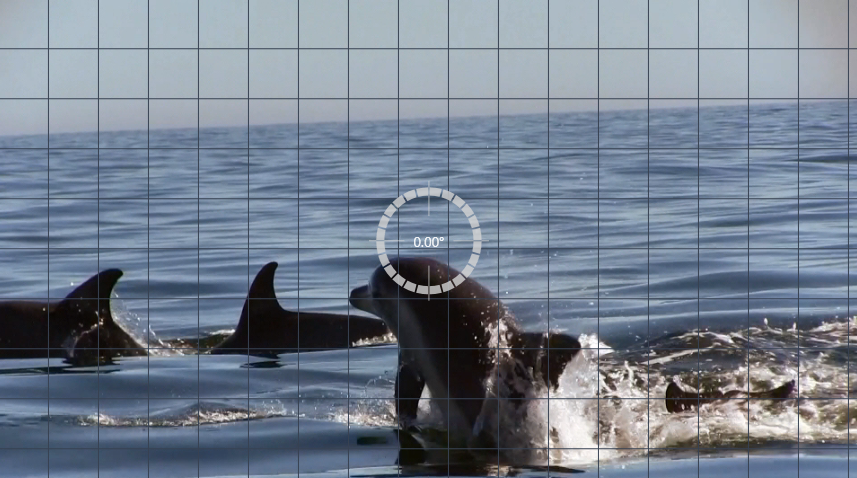
Ready to straighten an image (with crosshairs).
Several functions pertaining to Straighten are provided on the toolbar below the preview.
Guide line options: The two buttons in the Editor panel set the mode for the lines that are superimposed on the preview:
• Crosshairs: Adds a pair of crossed lines that can be dragged with the mouse to serve as a reference for true vertical and horizontal alignment anywhere in the image.
• Grid: Produces a fixed, repeating grid pattern over the entire image.
Set angle: To set the degree of rotation you can either use the slider on the toolbar below the image, or click and hold the left mouse button while dragging over the preview. Rotations up to 20 degrees in either direction are supported.
Clear: Sets the image back to its original state.
This tool corrects the red-eye effect that often occurs in flash photography when the subject’s gaze is towards the camera. Mark the area around both red eyes with the mouse. Extreme precision shouldn’t be necessary, but you can experiment with changing the area slightly if you are dissatisfied with the correction.
Clear: Sets the image back to its original state.