Seamless Transitions (Ultimate)
The Seamless Transitions category consists of motion-based animated effects that blur the passage from one clip to the next, creating what is sometimes known as an invisible cut. Whether the motion is up, down, or to the side, the result is similar to a whip pan effect. Some transitions include rotation and you can edit the transitions to control the zoom level, position, edge softness, and rotation settings. For example, you can zoom in and align the sky in the first clip with a similarly colored sky in the second clip, ensuring that the transition is as seamless as possible.

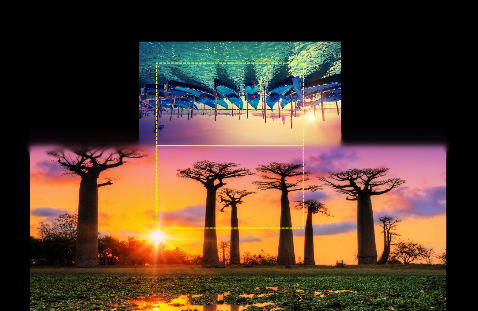
The Seamless Transition alignment rectangles (left) let you set the areas that will overlap and blend. You can then use the Preview area (right) to check the results
1 In the Timeline, choose where you want to place your Seamless Transition. Ensure that the clips are trimmed to the frames that have content you can use for aligning the transition.
2 From the Edit tab, click the Navigation bar for the Library panel, and choose Transitions  .
.
 .
.3 Navigate to the Seamless Transitions category, and click a transition thumbnail.
You can preview the transition in the Player panel.
4 Drag the transition to the Timeline, placing it between two clips, at the start of the second clip.

5 Preview the result in the Player panel. You can stop here if you like the results.
6 To edit the transition, right-click the transition in the Timeline and choose Transition > Edit.
The Editor panel opens with the settings for the Seamless Transition. In the Player panel, an interactive area lets you align the two clips.
7 Adjust any of the following settings:
• Duration: Sets the overall length of time for the transition.
• Transition Type > Select: Switches Seamless Transition presets.
• Clip A Position/Clip B Position: Lets you use sliders instead of the interactive Hand icon to set the position of the clips.
• Clip A Size/Clip B Size: Zooms in or out of a specific area of your clip by adjusting the size of the clip. This helps you isolate areas that match in each clip.
• Edge Softness: Adjust the softness of the edge along the transition line for the clips.
• Rotate Direction: If you choose a preset than includes rotation, you can choose between a Clockwise or Counterclockwise motion.
8 To align the clips, in the interactive area of the Seamless Transition panel, position your pointer over the clip you want to reposition, and when the hand icon appears, drag the clip. Position the area where you want the transition to occur within the yellow rectangle. Do the same for the other clip, ensuring the clips overlap along the transition line of the two rectangles.

The Up & Rotation preset was used to align the sky areas. Clip A is on the bottom and the Size has been increased to choose an area of the sky that matches the sky in Clip B (top).
Note: The yellow rectangles must be completely filled by each clip. A blank area will result in harsh lines.
9 In the Player panel, click Play to preview the transition.
10 Fine tune the controls until you get the results you want.