Using a Shape mask to edit specific areas
You can use a Shape mask to complete many editing and creative tasks by setting the Mask Properties and Matte Properties you want.
Functions include:
• Opacity: Create transparent areas based on shapes, text, brushstrokes, or color selected with the Magic Wand.
• Color Correction: Selectively brighten an area or desaturate all but one element, boost color in specific areas and more.
• Invert Color: Invert colors in the selected area.
• Replace Color: Select and change one color for another color.
• Black and White: Create a Black and White film effect, leaving some areas in color.
• Zoom and Loupe: Create magnification effects in selected areas.
For a full list, refer to the Functions menu.
Filters include:
• High Pass
• Low Pass
• Dichroic
• Color

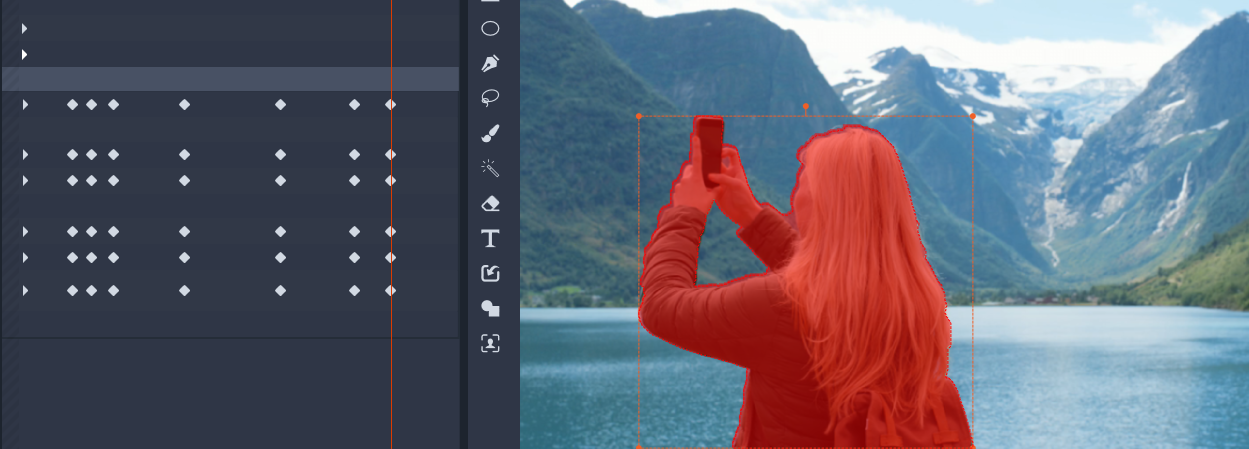
The Mask panel (left) and the Mask preview in the Player panel (right) let you create, view, set properties, and edit masks.
1 Do one of the following:
• In the Timeline, select a clip that you want to mask, and click Mask to display the Mask panel (shares a space with Library and Editor panel). Click Create Mask to add a Mask Track above the clip and automatically create a mask (yellow bar) that matches the length of the selected clip.
• In the Timeline, select a clip that you want to mask, and click Mask to display the Mask panel. Click Create Clip Mask to add a mask directly to the clip.
• In the Timeline, right-click a track head above which you want to add a mask, and choose Insert New Track > Mask Track. Hold down Ctrl and drag along the mask track to set the length of the mask (yellow bar).
2 In the Mask panel, click Create Shape.
3 Choose one of the shape tools along the left edge of the Mask preview, and create one or more shapes, clicking Done in the preview area when you finish.
4 In the Mask panel, adjust the properties for the shape, including the Transform mode to determine the interaction between shapes.
5 If you want to create a dynamic mask, use the keyframes in the Mask panel to adjust the properties over time.
6 If you need to organize the shapes, for more complex masks, click Add a New Group (bottom of Mask panel). Add as many shapes and groups as you need.
7 In the Mask panel, click Function (near the top of the panel).
8 From the Mask Properties area and the Matte Properties area, from the drop-down menu choose Function or Filter, and choose a function or filter from the corresponding drop-down menu.
9 Adjust the settings to get the effect your want.
If you want to remove an effect, choose None from the drop-down menu.
1 Create a shape mask.
Note: If masking an irregular shape that is moving, it is recommended that you try using the Brush tool with Smart Edge enabled to create your mask.
2 In the mask properties area, ensure keyframing is turned on for the shape you have created.
3 Use the playback controls in the Mask preview area to move through the frames, stopping when you need to edit the mask so that it covers your target area.
4 In the Shape properties area, do one of the following:
• Click the Replace button, and in the Mask preview area, use the Brush tool (with Smart Edge, or another tool of choice), to redraw the mask (the outline for the previous mask remains as a guide), and click Done.
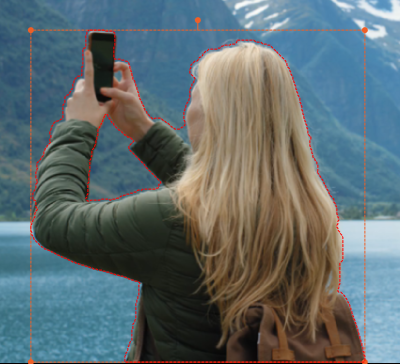
Outline in Replace mode
• Click the Modify button, and in the Mask preview, use the tools you want (for example, Brush tool with or without Smart Edge to add to the mask, or Eraser tool to remove from the mask) to edit the shape, and click Done.
Keyframes are added for the edited mask shape.
5 Repeat steps 2-4 for any additional frames.
The keyframes on the left indicate each time the mask has been modified or replaced in order to match the mask to a moving subject.