The Project Timeline
The timeline is where you create your movie, by adding video, photo and audio assets from the Library, by editing and trimming these core media, and by enlivening them with transitions, effects, and other enhancements.
The timeline consists of multiple tracks – as many as you require – in a vertical stack. Tracks nearer the top of the stack are positioned towards the front when viewed, their opaque parts obscuring the tracks below.
The basic action of movie authoring is to drag an asset from the Library to a timeline track, where it is called a clip. With a little practice, you can lay out a rough edit of a movie very quickly just by adding its main media assets at their approximate timeline positions.
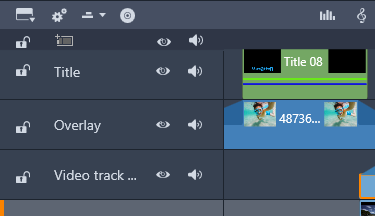
At the left end of the timeline are track headers with several controls per track: a lock button, the track name, and monitoring buttons for the track’s video and audio.
The track header: To the left of each track is a header area that provides access to functions such as disabling video or audio monitoring for the track.
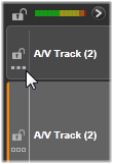
The default track: One track is highlighted with lighter background color, and is also marked with an orange bar to the left of the track header. This is the default track. It has a special role in certain editing procedures; for instance, it is the target track for pastes. To make another track the default track, click in its header.
Your current position on the timeline corresponds to the video frame shown in the Player panel. The current position is indicated by a vertical red line, at the bottom of which is a draggable scrubber handle. Another vertical line marks the same position in the Editor panel (in the keyframe area).
The space just under the toolbar can be occupied by the Timeline Navigator or the Storyboard, or by neither. The Timeline Navigation tool selector is located near the left end of the timeline toolbar. It includes a dropdown that lets you select which tool you want displayed in that area.

The Timeline Navigator is an auxiliary navigation panel that can be revealed or hidden by clicking its icon on the Timeline Navigation tool selector near the left end of the timeline toolbar.
The full-width strip appears just below the toolbar. It gives a bird’s- eye view of your whole project at a reduced scale. In the Timeline Navigator, the bars representing clips have the same colors as they do on the timeline, except that the bar representing the selected clip is drawn in orange. Clicking in the Timeline Navigator allows you to speedily access any timeline location.

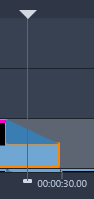
A portion of the Navigator strip, showing the current position (vertical line, left) and the translucent draggable view window.
The gray rectangle that encloses a portion of the Timeline Navigator display – the view window – indicates the section of your movie currently visible on the timeline tracks.
To change which part of the movie is in view, click and drag horizontally within the view window. The timeline scrolls in parallel as you drag. Since your timeline position does not change, this may take the scrubber out of view.
Assembling a movie can involve juggling a large number of photos and video clips, as well as deciding where to place titles, Montages and the like. In the Storyboard, the clips on one track of your movie are presented as a sequence of icons, so you can see at a glance what is included and where. To choose which track to view in the Storyboard, use the Storyboard link button in the track header.
Any of the photos, video, audio, projects, templates and titles in the Library can be added to your movie by dragging and dropping them onto the Storyboard. Once there they can be rearranged, or removed altogether if you change your mind.
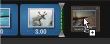
Different types of clips are represented in the Storyboard with different colors. For example, photos and videos have a blue frame, and projects have a gray frame. As in the timeline, clips that have had effects applied appear with a magenta line on the top, and clips with corrections have a green line. A colored band connects the Storyboard icon with the position of its clip on the timeline; a gap in the timeline is reflected in a gap in the Storyboard. Once you become familiar with the color coding, it will help you quickly visualize the structure of your movie.
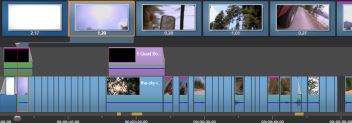
The Storyboard displays a sequence of icons representing the contents of one track. Effects (magenta) and corrections (green) are indicated on the top edge of the icon; the length of the clip is shown on the bottom.
The space just below the toolbar where the Storyboard appears is also used by the Navigator (and in the Disc Editor by the Menu List). Which tools is visible, if any, is controlled by the Navigation tool selector near the left end of the timeline toolbar.
To scroll to a part of the Storyboard that is not in view, hover with the mouse over the Storyboard until a hand cursor appears. Now click the left button and drag the Storyboard. If you drag the mouse quickly and release the mouse button, the Storyboard will briefly continue scrolling, thus creating a ‘swiping’ behavior.
Alternatively you can hover over the Storyboard and use the mouse wheel to scroll, or use the arrows at each end of the Storyboard.
Although most editing takes place on the timeline tracks, the Storyboard has some editing capability. For instance, effects can be added directly to a clip on the Storyboard by dragging and dropping the effect onto the clip. The clip’s context menu offers the same set of commands here as on the timeline. Any editing that takes place on the Storyboard is immediately reflected in the timeline, and vice versa.
Adding clips: Any photo, video, audio clip, project, template or title can be added to your project by simply dragging it from the Library to the Storyboard. An insertion line appears to indicate where the new clip will be placed. You can select multiple clips to add them all at once.
Inserting or replacing clips: If you are inserting material between clips already on the Storyboard, drag the new clip so that it overlaps the right side of the clip that will precede it. When the insertion line appears and a space opens up, drop the new clip into the gap.
To replace a clip, drag the new one onto the clip to be replaced. The insertion line will appear, and the old clip will highlight to indicate proper placement. The new clip must be the same type as the old. A video clip cannot be replaced by a photo or audio clip, for example.
Selecting clips: To select a clip, click on its icon; an orange frame around the clip indicates selection. The timeline scrubber will jump to the beginning of the selected clip, and a connecting band of color will link the Storyboard clip with its timeline counterpart. If the timeline position of the selected clip is currently off-screen, it will be brought into view.
You can select multiple clips using the Shift and Ctrl keys according to the usual Windows conventions.
Reordering clips: To pick up a clip and move it, click on it until it is selected, and then drag it to its new location. If necessary, the Storyboard will scroll until you reach the desired position.
To change the zoom level of the timeline, either click and drag horizontally in the time-ruler along the bottom of the timeline, or drag the sides of the view window. The first method has the advantage that it always leaves the screen position of the playhead undisturbed, which may make it easier to orient yourself after the zoom.
To change the zoom of the Navigator itself, use the plus and minus buttons immediately to its right.
Double-clicking on the view window adjusts the zoom of both the Navigator and the timeline such that your entire movie fits within the Movie Editor window.
The height of the timeline panel, along with the relative proportions of the Library/Editor panel and the Player panel, can be adjusted with the sizing grip in the form of an inverted T in the middle of the screen.
To adjust the height of individual timeline tracks, grab and adjust the separator lines between the track headers on the left. If the vertical size of all tracks exceeds the available viewing area, a scroll bar at the right will allow you to select which tracks are in view.
Set the height of the Storyboard (when it is visible) by vertically dragging the horizontal separator along the Storyboard’s bottom edge.