The Voice-over tool
 Recording a voice-over in Studio is as easy as making a telephone call. Just open the Voice-over tool, click Record and speak into a microphone attached to your computer.
You can narrate as you watch the movie play so that your words match the action on the screen. You can also use the tool as a quick way of capturing ambient music or home-made sound effects via your microphone.
Before you can record audio using the Voice-over tool, you will need to connect a microphone to the input jack of your PC sound board. Review the video scenes in your movie and decide where you want the voice-over to begin and end. When you are ready, open the Voice-over tool.
Select your starting point on the timeline of your project. You can do this by selecting a clip, playing the movie and stopping it at the desired point, or by dragging the timeline scrubber.
Position the microphone for use and try speaking a test phrase to check your recording level (see “Voice-over level” below). When you are satisfied, click the Rec button (which toggles to a Stop button during recording).
A three-second countdown is displayed, then your movie begins to run in the Player. Perform your narration, and click the Stop button when done.
Now you will be asked if you want to keep the recording. If you answer in the affirmative, the voice-over clip will be added to your Library and will also be placed automatically on the voice-over track on the timeline.
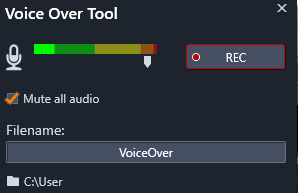
The Voice-over tool, ready to go. Just click the Rec button, count to three along with the software, then start talking.
Voice-over level: As you record, watch the peak level meter display to make sure that your microphone is generating a strong signal but not overmodulating. Watch this meter to make sure your recording levels get neither too high nor too low. The indicator changes color from green (0-70% modulation), through yellow, to red.
Filename: With this text field you can preset the file name used for voice-over audio files. The first file is given the name you specify; if you leave it unchanged, later files are given a numeric suffix – e.g. ‘Voice-over (1)’ – that increases with each take.
Location: Clicking on the folder icon lets you navigate to a new file system folder for storing voice-over clips.
Adjust the recording level slider as necessary to stay in the right range. The slider is located immediately below the peak meter. Generally, you should try to keep your audio peaking in the yellow (71-90%) and out of the red (91-100%).
Mute all audio: The existing sounds on your movie soundtrack are sometimes distracting when you are trying to record a voice-over. This check box allows you to switch off timeline audio completely during recording.