Timeline audio functions
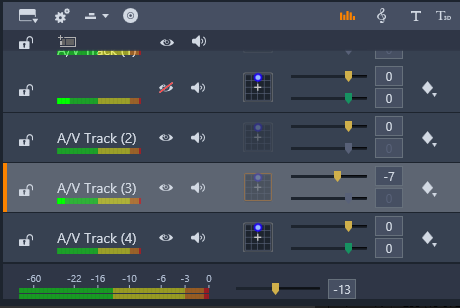
Along with the track management functions, the header area of the timeline is also home to a number of audio controls.
Below the timeline track headers is a master playback level indicator. As you preview your project, it shows the total output from all tracks as currently mixed.
Below the timeline track headers is a master playback level indicator.
Track level: The upper slider sets the output level of the track as a whole. You can restore the default value by double-clicking the slider—no overall change is applied to the original volume of the clips on the track.
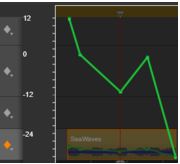
Clip level: The lower slider sets the level of the current clip at the scrubber position. If no clip is currently selected on the track, this slider is unavailable. The volume contour of a clip can be controlled with keyframes, as discussed immediately below. When keyframing is in use, the slider level causes new keyframes to be created or existing ones to be repositioned.
Click the diamond icon for the audio track to activate audio keyframing.
For the purposes of timeline editing, all panning occurs in surround mode, so you only have to deal with a single version of the Panner controls. The surround-panned clips can be mixed down to other output configurations after editing of the project has been completed. This lets you work with a single set of panning decisions for all formats you might eventually produce.
Changes made with this tool apply to the current clip only. They stay with the clip even if you move or copy it to another track.
To open the Panner, click grid icon in the track header when Audio Mixer mode is active. This button is grayed if there is no clip on the track at the scrubber position. The sound source is denoted by a blue spot on a two-dimensional grid. The listener is situated in the center, facing forward.
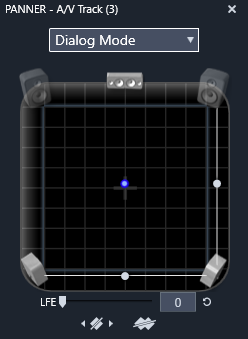
Positioning the clip audio using the Panner in Dialog Mode. Note that the icons for the front corner speakers are translucent, indicating that they are not used in this mode. As adjusted here, the audio for the track will be heard coming from the right.
Selection list
The dropdown list at the top of the Panner window provides three methods for distributing the sound across the set of six surround speakers.
5.1 is the best general purpose setting for natural sound reproduction. Use it for general atmospheric sounds, such as barking dogs, or cars passing by. The five main speakers are represented by icons in the work area. The sixth, the LFE (low-frequency effects) speaker, is too low-pitched to provide positional cues. Its level in the surround mix is controlled by a slider beneath the work area.
Center channel off is the preferred setting for an immersive music track.
Dialog mode combines the center speaker with the two at the rear. This combination is suitable for dialog involving multiple speakers.
Panner work area
The main body of the Panner window schematically depicts a listening area with a typical arrangement of loudspeakers. The cross icon in the center of the area indicates the position of the listener.
A blue control point sets the position of the sound source. The speaker symbols at the edge of the work area show your typical surround 5.1 speaker arrangement, with the screen at the top.
If you want to control the sound source position in one dimension, horizontal or vertical, use the slider at the bottom or right of the work area respectively.
LFE channel: Surround supports a special subwoofer channel (the ‘.1’ in ‘5.1’) that allows you to boost or cut the lowest frequencies for special effects. Control the LFE enhancement with the slider under the work area. Since the ear is unable to pinpoint the location of these low-frequency sounds, the LFE is not assigned to a spatial position.
Keyframe buttons: The keyframe buttons at the bottom of the panel allow you to add, remove and navigate between keyframes. The Add symbol automatically switches to Delete if you are positioned on an existing keyframe’s position.