Tone Curve
The Tone Curve lets you perform color and tonal corrections by adjusting either individual color channels or the composite (RGB) channel.
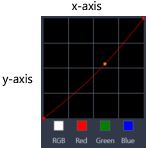
The x-axis of the graph represents the original tonal values (from highlights on the right, to shadows on the left); the y-axis of the graph represents the adjusted tonal values (from dark/less color at the bottom, to light/more color at the top).
The diagonal line on the graph is what you adjust to create your “curve”. Moving the curve up and to the left lightens the clip and increases the color in any channel; moving the curve down and to the right darkens the clip or decreases the color of a given channel. If you have a clip with a blue cast, for example, you can decrease the blue in the image by selecting the Blue channel and moving the curve down and to the right.
You can add one or more nodes to the curve, to give you more precise control over the areas that you want to adjust.
1 Open the Editor panel, click Color > Tone Curve.
2 Below the curve graph, select one of the following color channel options:
• RGB — lets you edit the red, green, and blue channels in a combined histogram
• Red — lets you edit the red channel only
• Green — lets you edit the green channel only
• Blue — lets you edit the blue channel only
3 Drag points on the graph to adjust the relationship between the Input levels (the brightness of the original pixels) and the Output levels (the brightness of the corrected pixels).
4 If you want to add a point to the curve, click along the line where you want to add the point.
Note: At any point you can reset the curve by clicking Reset All.