Video scopes
Pinnacle Studio offers the following video scopes to help you evaluate the color and tone information in your video clips. As you make color adjustments, the information on the scopes changes, so you can evaluate the impact of the change in the Color Grading view in the Player panel or by using the color data depicted in the video scope.
Waveform
A waveform scope displays the chrominance in a video clip using a graph where the vertical axis represents intensity, from zero at the bottom to 100% at the top.
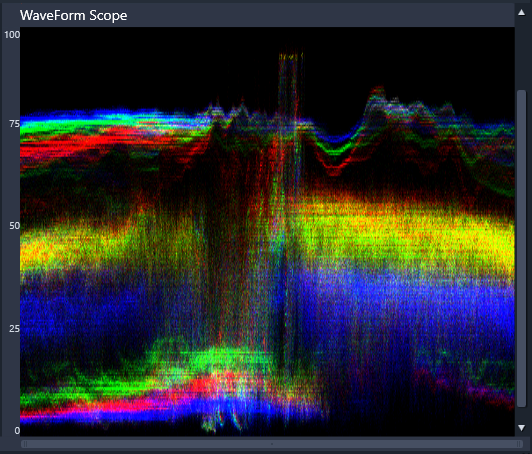
A Waveform scope shows the distribution of colors from zero intensity at the bottom to 100% intensity at the top
Vector - Color (Vectorscope)
Vectorscopes have been used by video professionals for a wide range of purposes, including evaluating if the color intensity of video footage was within standard broadcast range. The circle of the color vector scope displays chrominance (color intensity), from zero intensity at the center of the circle, to 100% intensity towards the edge of the circle. The circle is divided into color areas, making it easy to see the color dispersion for the currently selected frame in the video clip. Small grids towards the edge of the circle are used to mark the intensity limit — pixels that appear beyond the targets are not considered broadcast safe.
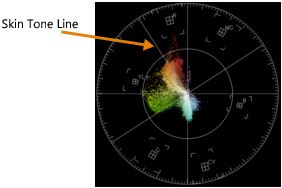
Selective Vectorscope: This feature is often used to identify and correct skin tone in a video. By using a brush to select skin tones in a video frame, you can use the vectorscope to ensure that the skin tones are aligned along the skin tone line.
Histogram
A histogram lets you display the tonal and color range of a video. Evaluating the distribution of pixels for a selected frame in your video lets you determine if there is a color cast or in the case of underexposed footage, it can help you determine if there is enough image data in the shadow areas to correct the imbalance.
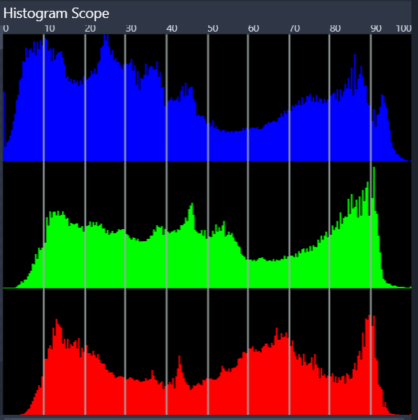
The histogram displays the distribution of pixels for the clip, from dark (shadows) to light (highlights) along the horizontal axis.
RGB Parade
The RGB Parade scope lets you view the red (R), green (G) and blue (B) components of your video clip in a graph, where the vertical axis represents zero intensity (bottom) to 100% intensity (top).
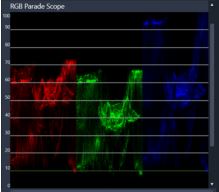
RGB Parade lets you evaluate the colors relative to each
1 Select a clip in the Timeline.
2 Open the Editor panel, and click Color.
3 Enable the Show Video Scope check box at the top of the panel.
4 From the drop-down menu, choose one of the following videoscopes:
• Waveform
• Vector - Color
• Histogram
• RGB Parade
1 Select a clip in the Timeline.
2 Open the Editor panel, and click Color.
3 Enable the Show Video Scope check box at the top of the panel.
4 From the drop-down menu, choose Vector - Color.
5 Below the vectorscope, click Selection Brush.
6 In the Color Grading preview, drag the brush across the areas of skin.
The colors selected by the brush display on the vectorscope.
7 Use any of the following controls below the vectorscope to adjust the selected area:
Note: Depending on the app window size, you might need to scroll (horizontal) to see all the controls.
• Eraser: In the preview, drag over the area you want to remove from the selection.
• Brush Size: Drag the slider to adjust the diameter of the Selection Brush or Eraser.
• Clear Selection: Use this button to clear all brushstrokes and redo your selection.
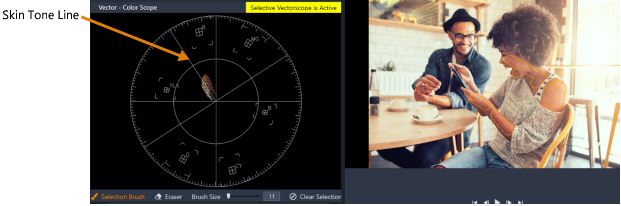
The Selective Brush mode was used to brush over skin areas in the preview (brushstrokes outlined in yellow). On the left, the vectorscope shows that the selected skin colors appear directly on the skin line
8 Using the Skin Tone Line as a guide (skin tones should fall along the line), make any color adjustments.
9 When you are finished adjusting the colors, click Clear Selection to deactivate Selective Vectorscope mode (yellow Selective Vectorscope is Active label disappears) and to return to viewing all clip colors in the vectorscope.