Using keyframes
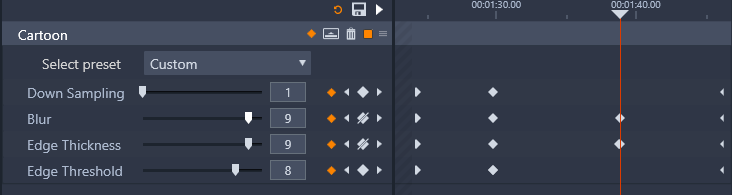
Keyframing is a method used for mapping individual properties of a selected element to specific moments in a video. By setting multiple keyframes, you can precisely change things like position, opacity, and the size of elements throughout the duration of a video. Keyframes can be found in the Editor panel, where you can access and control clip Properties settings, as well as Corrections, Color, Effect, 360 Video, Pan and Zoom and Time Remapping. Keyframes are also available in the Mask panel and the Title panel, and in other places throughout the application. A keyframe area displays to the right of the properties and functions listed in the panel you have open.
To use keyframes in the keyframe area

1
In any of the panels that include a keyframe area, drag the scrubber to the position where you want to add a keyframe.
2
Click the
Turn on/off keyframing button (diamond) to the right of the control you want to adjust (sometimes there is an on/off button above a section that adds keyframes for the entire section). The button turns orange when keyframing is on, and for individual properties, keyframe controls display to the right of the button.
Note: When you turn keyframing on, a keyframe is automatically added at the current scrubber position.
3
Choose the settings you want for the current keyframe.
4
Do any of the following to set and manage your keyframes, moving the scrubber each time you want to set a new keyframe:
•
Add a keyframe: Click the white
Add/Remove Keyframe button (diamond) next to the control you want to set. Then adjust the control, using the preview in the Player window as a reference.
•
Select a keyframe: Click the arrow buttons (triangles) on either side of the
Add/Remove Keyframe button to navigate to a specific keyframe or drag across the keyframe (the keyframe displays as orange when you select it by dragging).
•
Select multiple keyframes: When working with keyframes that aren’t in the start or end positions, you can drag across keyframes to multi-select (keyframes display as orange when you select them by dragging). You can then drag the keyframes to a new position, or right-click to access
Delete,
Cut,
Copy, and
Paste functions.
•
Group or ungroup keyframes: To group keyframes, select multiple keyframes, right-click, and click
Group. To ungroup keyframes, right-click a keyframe in a group, and click
Ungroup. Note: You can group keyframes from one parameter or multiple parameters.
•
Move a keyframe: Click a keyframe and drag it horizontally to a new position.
•
Delete a keyframe or a group of keyframes: Select the keyframe or the group of keyframes (using the arrow buttons), and click the
Add/Remove Keyframe button (icon changes when in "Remove" mode) or drag across a keyframe to select it, right-click the keyframe, and choose
Delete.
•
Copy and paste one or more keyframes or a group of keyframes: Select one or more keyframes or a group of keyframes, right-click, and choose
Copy. In the keyframe area, right-click where you want to position the keyframes, and choose
Paste to paste the keyframes with their original value or
Paste Blank to paste keyframes which retain the structure and spacing of the copied keyframes, but with no value assigned.
•
Copy and paste keyframes from one parameter on a source clip to the same parameter on a different clip: In the source clip, select keyframes from a parameter you want, right-click, and choose
Copy. In a different clip, click the same parameter you chose in the target clip, right-click in the keyframe area where you want to position the keyframes, and choose
Paste to paste the keyframes with their original value or
Paste Blank to paste keyframes which retain the structure and spacing of the copied keyframes, but with no value assigned.
•
Copy and paste keyframes from multiple parameters: In the source clip, select keyframes from multiple parameters (such as brightness, transparency, saturation, etc.), right-click, and choose
Copy. In the keyframe area of the current clip or a different clip, right-click where you want to position the keyframes, and choose
Paste to paste the keyframes with their original value or
Paste Blank to paste keyframes which retain the structure and spacing of the copied keyframes, but with no value assigned.
Caution: If you turn off keyframing (by clicking the Turn on/off keyframing button), you will lose all keyframes for that control (keyframes are not hidden--they are removed). If you click the Turn on/off keyframing button in a title bar for a section, all keyframes for all controls will be removed.
The Turn on/off keyframing button in a title bar will add or remove keyframes for all controls within that section.
In this example, the scrubber is aligned with two keyframes. You can remove a selected keyframe by clicking the Add/Remove Keyframe button (diamond with line through it) that appears to the right of the control.
You can also select a group of keyframes and copy and paste them to another clip.