Correcting photos
The five corrections available within the Photo Editor are Enhance, Adjustments, Crop, Straighten and Red-Eye. The first two are controlled by means of s that open in the upper-right corner of the Photo Editor; the other three are controlled interactively on the image preview.
This correction opens the Image Correction CPU panel of tools for fixing problems to do with color and illumination. The tools can also be used creatively to achieve custom looks or stylistic effects that extend, not just repair, the original material. They are presented in the groups described below.
The two special tools in this group adjust the image automatically after analyzing its brightness spectrum. You can change the tool settings further by hand to customize the adjustment if required.
White Balance: When you check the White Balance box, a color temperature setting for the image is computed, and the Temperature bias slider is displayed. Use the slider to customize the setting interactively as you preview.
Levels: Checking this box activates an automatic illumination adjustment, and opens a set of three controls. The first is Optimization, a dropdown list that lets you set the overall behavior of the tool by choosing either “Contrast” (optimization of contrast only) or “Full” (general lighting optimization).
The Brightness and Vibrance sliders can take on values ranging from –10 to +10. A zero setting represents no change to the automatically-chosen value. Brightness provides a general boost or cut in brightness that is applied equally across the whole image. Vibrance, which is designed primarily for use with images of people, is similar to a saturation control, but minimizes the unnatural appearance characteristic of oversaturated skin tones.
This group of controls allows you to adjust the general lighting properties of your image.
Brightness: This control provides an overall brightness adjustment that impacts the light and dark areas of the image equally. For finer control in brightness editing, use the Selective Brightness tool instead (see below).
Contrast: This control increases the difference between the light and dark areas of an image. Boosting the contrast may enliven a dull photograph, although at the risk of losing definition in areas that are already very bright or very dark.
Temperature: The color temperature control changes the color composition of an image to make it seem ‘warmer’ or ‘cooler’. Indoor lighting such as a tungsten bulb or candlelight is perceived as warm, while daylight, especially shade, is perceived as cold. Using the temperature control primarily changes the yellow and blue values in an image, with little effect on green and magenta.
Saturation: This control regulates the color intensity of an image. Increasing the value pumps up the colors, making them more vivid, or even lurid. Decreasing the value drains the image of color until at zero only shades of gray remain. For finer control of saturation, use Selective Saturation instead. A related adjustment is Vibrance, which is often preferred in portraits because it preserves skin tones.
Clarity: Increasing Clarity boosts contrast in the midtones, tending to sharpen edges in an image. A small increase in Clarity often improves a picture’s overall appearance.
Haze: Increasing Haze lightens the image by compressing its dynamic range upwards. What was originally black becomes gray; lighter tones are also brightened, but to a diminishing degree. This produces a simultaneous lightening and softening effect. The opposite result, darkening and detailing, is achieved by setting negative values of Haze. This drops the brightness floor of the image, sharpening the highlights and midtones by a downward expansion of the dynamic range.
If the white or gray areas of an image bear a slight tint or color cast, the controls in this group can help restore a natural appearance.
Gray-scale picker: Activate the picker then click in a nominally white or gray area of the image, where no coloration ought to be present. The image white balance will be automatically adjusted so as to remove the unwanted tint.
Color circle: Browse the color field by moving the control point away from the center until a natural image appearance is achieved.
To enable you to edit particular brightness zones in an image without impacting others, five separate brightness controls are provided:
Blacks: This slider affects only the darkest areas in the image. For best results, leave editing both Blacks and Whites until last.
Fill light: Increasing this slider may produce better detail in shadowy (but not black) areas of a full-contrast photograph.
MidRange: The zone impacted by this slider includes the entire medium range of illumination.
Highlights: This slider affects the bright locations in the image. It can be used to mute areas overexposed due to flashes, reflections or brilliant sunshine.
Whites: This slider impacts the parts of the image that are considered ‘white’. Edit Whites and Blacks last.
Whereas the standard Saturation correction increases color saturation equally across the entire spectrum, Selective saturation allows for individually boosting or suppressing the primary and secondary colors. For example, if blue appears to be too strong, it can be turned down while other colors retain their intensity.
During import, Studio automatically detects certain parameters, but a variety of factors can lead to the occasional incorrect identification. Adjustments allows any of these basic image properties to be changed, if needed.
Alpha
Your photo may have an Alpha channel, an 8-bit grayscale image plane that defines the transparency level of each pixel in your photo. If you wish to remove the alpha channel, choose the Ignore Alpha option.
Interlacing
If the Interlacing options on the image were misidentified on import, use this dropdown to impose the correct setting.
Stereoscopic 3D
If the format of a 3D image file was wrongly identified on import, set the correct stereoscopic layout with this dropdown list.
Use this tool to emphasize a specific section in an image, or to remove undesired components.
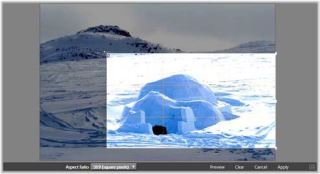
Cropping an image.
Bounding box (cropping frame): After you select the cropping tool, a resizable frame is placed over the image. Drag the sides and corners of the frame to crop the image, or drag the center of the bounding box after cropping to adjust its position.
Aspect ratio: The Aspect ratio dropdown on the control bar can be use to ensure that the crop rectangle maintains a desired standard proportion while being resized. Standard (4:3) and wide (16:9) frame aspect ratios are supported.
Preview: This function displays the cropped image without the surrounding material. Press Esc or click the image to return to the editing view.
Clear, Cancel and Apply: Clear returns the bounding box to its original dimensions; Cancel closes without saving any edits made; Apply saves the changed image without exiting the editor.
This correction enables you to straighten an image in which elements that should be exactly horizontal or vertical are visibly tilted. Unless you have cropped the image, it dynamically resizes as you rotate to keep the corners from being visibly cut off. With a cropped image, no resizing takes place as long as there is sufficient excess material to fill in the empty corners.
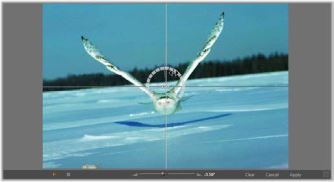
Ready to straighten an image (with crosshairs).
Several functions pertaining to Straighten are provided on the toolbar below the preview.
Guide line options: The two buttons at the far left of the toolbar set the mode for the lines that are superimposed on the preview as a guide to straightening. Selecting either button deselects the other. The Crosshairs (leftmost) button adds a pair of crossed lines that can be dragged with the mouse to serve as a reference for true vertical and horizontal alignment anywhere in the image. The Grid button produces a fixed, repeating grid pattern over the entire image.
Set angle: To set the degree of rotation you can either use the slider on the toolbar below the image, or click and hold the left mouse button while dragging over the image. Rotations up to 20 degrees in either direction are supported.
Clear, Cancel and Apply: Clear sets the image back to its original state; Cancel closes without saving any edits made; Apply saves the changed image without exiting the editor.