Audio Corrections
The correction features in the Editor panel are Equalize, Adjustments, Compressor, Expander, De-esser, Noise Reduction and Pitch Scaling. Corrections can be applied both to Library assets and to timeline clips. Many controls for Corrections are shared between different features.
Equalize
Equalizers are similar in principle to the treble and bass controls of an audio system, but with finer adjustment capabilities. This equalizer divides the audio spectrum into five frequency bands, each centered on a specified frequency and with a settable amount of gain.
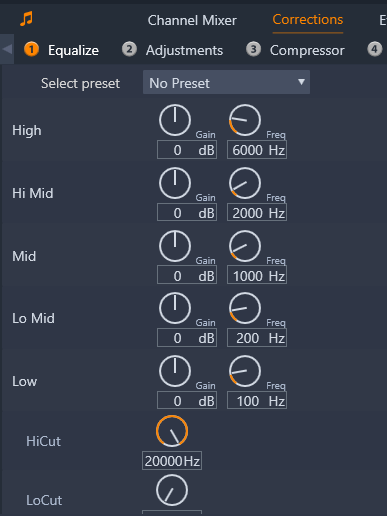
The controls for the Equalize correction feature. The dials let you set Gain and Frequency and the HiCut and LoCut settings.
Select preset: A number of fixed presets can be selected from the dropdown list; for example, you can select a ‘telephone voice’ effect.
Gain: Using the Gain parameter, you can determine the amount that the respective frequency band contributes to the overall sound (from -18 to +18).
Frequency: Using the Frequency parameter you can specify the center frequency of each band.
LoCut and HiCut: These controllers completely eliminate frequencies below or above a set value. The default values allow all frequencies.
Adjustments
The only parameter available under the Adjustment tool the is LFE (Subwoofer), which lets you either activate or deactivate the Subwoofer channel for a particular clip, or to stay with the Library’s setting, determined on import.
Compressor
A compressor smooths the dynamics instant by instant in an audio signal, scaling back the loud sections while typically boosting the overall sound. This gives the impression of a stronger signal, even though the level peaks are not higher after compression than before. Light compression is very commonly applied in audio mastering of music tracks. Compression can also be used creatively in numerous ways depending on the material.
Select preset: Choose from a number of premade parameter sets for the compression filter.
Ratio: This control sets the compression ratio, which is the amount of compression applied to sections of the input signal that exceed the Threshold setting. For example, a 2:1 compression ratio means that a 2 dB increase of source level above the threshold produces only a 1 db increase in the output level. The allowed range is from 1:1 (no compression) up to 100:1 (hard limiting).
Threshold: All levels above this setting are attenuated by the value set in Ratio. You can apply an overall boost with the Gain controller to compensate for the level lost.
Attack and Release: Attack governs how quickly the compressor responds to an audio signal that has crossed the threshold. Larger values delay the onset of compression, allowing (for example) the brief attack of a piano note to remain distinct, while applying compression as usual for sustained sounds. Release controls the speed with which compression is switched off when the signal falls back below the threshold.
Gain: It is best to make adjustments to the gain after it has already been compressed.
Knee: A higher knee value causes compression to take hold gradually as the threshold sound level is approached and departed from, rather than switching on all at once. This changes the tonal qualities of the compressed sound.
Expander
The Expander decreases the gain of signals that fall below a chosen threshold. Expanders provide a gentler way of reducing noisy low- level signals than the abrupt cut-off of a gate.
Select preset: Choose from a number of premade parameter sets.
Ratio, Threshold, Attack, Release: These parameters have the same meanings as in the Compressor (see above).
Range: This controls the maximum gain reduction (attenuation).
Hold: This determines how long the expander remains active after the initial attack. Increasing this value is useful when, between louder signals, there are small pauses or much quieter passages that should not be amplified. In this use, the expander works like a noise gate.
De-esser
This audio filter inconspicuously removes distracting sibilance from recorded speech. The available parameters allow individualized fine adjustment of the effect.
Select preset: Choose from a number of premade parameter sets.
Frequency: This knob sets the frequency above which the De-esser is deployed.
Range: This knob controls the maximum attenuation that will be applied to the detected sibilance.
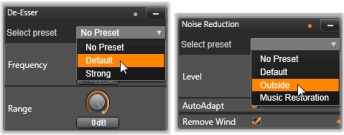
Setting and presets for the De-esser and Noise Reduction audio corrections.
Noise Reduction
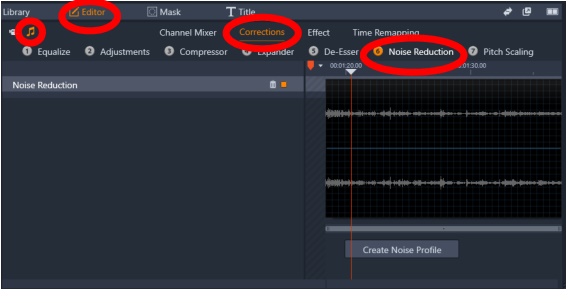
Noise Reduction helps reduce or eliminate undesirable background noise. By selecting a sample of the noise that you want to eliminate, you can create a noise profile that reduces the corresponding noise throughout the clip.
Noise reduction can be applied for a range of problems. The results obtained may differ, however, depending on the source material and the origin of the problem.
To apply Noise Reduction
Pitch Scaling
Pitch Scaling lets you change the pitch of audio without affecting the speed (no impact to the duration of the clip). For example, you can change the pitch of a narrator’s voice.