Understanding masks in Pinnacle Studio
The masking process starts by adding a dedicated Mask Track above the clip or track that you want to mask. You can also choose to create a Clip Mask when you want to create a mask for a specific clip, rather than adding a mask track.
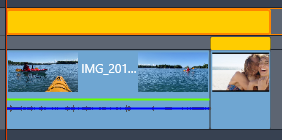
A yellow band on the mask track or across the top of the clip (in the case of a clip mask) indicates the duration of the mask. In the case of a mask track, you can adjust the duration of the mask in the same way you would other clips.
A Mask Track (yellow band on top) can extend across multiple clips. A Clip Mask (narrower yellow band above the end clip) applies to the selected clip only.
You can choose between two types of masks:
The mask you create is static unless you use keyframes to adjust it. You can add keyframes manually or if your version of the software includes Face or Object detection, you can use tracking to automatically add keyframes to adjust the position of the mask.
You can apply only one function or filter to a Shape mask (and its corresponding Matte area). You can create new mask tracks to layer masks. You can also layer Panel masks.
