Previewing disc menus (legacy Author tab)
The Disc Editor, like the Movie Editor, includes a Player for previewing Library assets and timeline clips. For a general introduction to the Player, please see Previewing edits in the Player.
The special functions provided by the Player when viewing menus in the Menu List are described here. Clicking a menu in the Menu List puts the Player into Menu input mode and previews the selected menu. You can also switch to that mode directly while any menu is selected by clicking the Menu tab above the Player screen in the Disc Editor.
Special controls also appear at the bottom of the Disc Editor Player.
 Menu Edit button: Creating or modifying the design and layout of disc menus is the task of the Menu Editor.
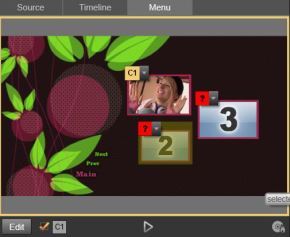
With Menu selected as the Player input mode (top), the Player provides interactive zones on the preview screen for assigning chapter links. Here ‘C1’ shows a chapter link has been assigned to the Play Movie button; the ‘?’ over the Scene Selection button shows that it is not currently assigned.
Show Link Numbers checkbox  : Check this box to cause link numbers to be displayed in the preview over every button in the menu. The link numbers match the format and color of the timeline chapter flags.
: Check this box to cause link numbers to be displayed in the preview over every button in the menu. The link numbers match the format and color of the timeline chapter flags.Disc Simulator button  : This button invokes the Disc Simulator window where you can preview your project with full interactivity to make sure your menus are behaving as expected.
: This button invokes the Disc Simulator window where you can preview your project with full interactivity to make sure your menus are behaving as expected.Burn Disc button  : When you are ready to test your project on an actual disc, click this button (or Export at the top of the screen) to invoke the Exporter, which will guide you through the process of ‘burning’ your movie onto an optical disc.
: When you are ready to test your project on an actual disc, click this button (or Export at the top of the screen) to invoke the Exporter, which will guide you through the process of ‘burning’ your movie onto an optical disc.As seen in the illustration above, when a menu with unlinked chapter buttons is previewed, those buttons are indicated by red question marks rather than a chapter number. Except perhaps for an unused subset on the final page of a multipage menu, all the chapter buttons on your menus should link to your movie.