Stop motion
The Stop Motion function of the Studio Importer lets you create animated films by stitching together frames grabbed from a live source, such as a video camera, webcam or DSLR. The result of your Stop Motion import will be a collection of captured images, and a project file created from the images.
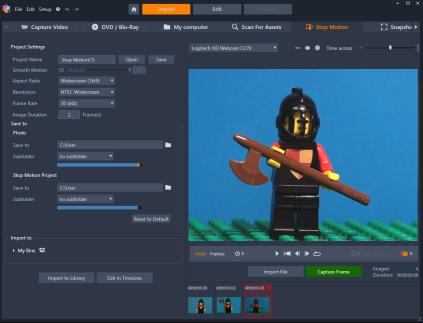
To prepare for Stop Motion import, make sure the camera is switched on and connected to your computer, then select the Stop Motion tab from the Import tab from panel of the Studio Importer. (See Import sources.) Before starting to capture, make sure that your destination folder, options and file name are set up in the other panels the way you want them.
If your source equipment is functioning correctly, you should have a live preview in the central area of the Importer window.
When you are ready to capture an image, you can click the Capture Frame button. A thumbnail of the grabbed frame is added to the Image Tray at the bottom of the window. Since this is a stop motion sequence, after each image is captured you will generally make small changes to the scene you are shooting in order to create the illusion of motion from frame to frame.
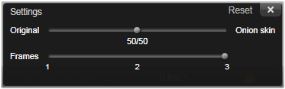
To make your task of gauging the movement easier, you can use alignment tools (line, grid, or circles). You can also use Onion Skin Mode, a mode that uses a ghosting effect whereby successive frames are shown simultaneously in translucent layers so that the differences can be clearly seen.
The number of images shot so far and the duration of the video (based on the number of images, rounded off) are displayed to the right below the control bar.
You can also import images that you have already captured for stop motion by clicking the Import File button below the control bar.
Project Settings
You can choose from the following settings for your stop motion project:
• Aspect Ratio: Set to Standard (4:3) or Widescreen (16:9)
• Resolution: Set to NTSC Standard or PAL Standard
• Frame Rate: Higher frame rates result in better quality, but require more image captures.
• Image Duration: Set the duration for each image you capture according to frames. The higher the number, the less images you need to capture, but the results might be less smooth.
The Stop Motion control bar
This bar provides transport and other functions for Stop Motion import. From left to right:

• Video and Frames indicators: These let you switch between previewing the live video feed and previewing the captured frames in the Image Tray. You can review – and if necessary replace – particular frames without having to undo other work.
• Auto Capture: The Auto Capture button toggles the feature on (orange icon) or off (white icon). Click the arrow for Auto Capture to specify the settings (Capture Interval and Duration).
• Navigation buttons: These buttons are for previewing your animation. They let you play, go to start, go back one frame, or go forward one frame. A Loop Play button lets you cycle the animation continuously.
• DSLR Capture: These optional controls can be used when you have a compatible DSLR connected to your computer (at this time most Canon DSLRs are supported). The DSLR Capture icon is orange when your DSLR camera connected. The arrow button lets you access the DSLR Settings dialog box. Here you can control the DSLR. This ensures consistent results across frames. The settings vary somewhat according to your camera and camera mode. It is recommended that you set your camera to Manual mode.
• Auto Focus (AF), Manual Focus (MF) and Show Focus: These optional controls can be used to adjust the focus for your camera in Pinnacle Studio when you have a compatible DSLR camera connected to your computer (at this time most Canon DSLRs are supported). Your camera lens needs to be set to AF to use these onscreen focus controls.
• Onion Skin Mode: The Onion Skin Mode button toggles the feature on (orange icon) or off (white icon). Click the arrow for Onion Skin Mode to specify the settings. The first slider (Original-Onion skin) shows the difference in transparency between the original and successive frames. The Frames slider controls the number of frames, in addition to the current one, that will display onscreen. Experiment to find the settings that work best for your movie.
The number of images shot so far and the duration of the film (based on the number of images, rounded off) are displayed to the right below the control bar.
Using the Image Tray with Stop Motion
When you click Capture Frame (button displays below the Stop Motion control bar), the Image Tray opens and displays the images that you capture. You can view the start time for each image (time displays above the thumbnail). You can click a thumbnail to choose the frame. You can delete the frame by clicking the red trash icon above the thumbnail. You can also insert a frame to the right of the selected thumbnail by clicking Capture Frame. Note: You must be in Video mode to capture frames (click Video on the left side of the control bar).

Alignment tools
Gauging movement in stop motion projects can be tricky. In addition to the Onion Skin Mode described above, you can use the following tools:
• Line: Drag across the screen to set a line with nodes that mark intervals. Look for the pink node to find the suggested alignment for your next capture.
• Grid: Displays a grid overlay onscreen
• Circles: Displays a circle pattern onscreen
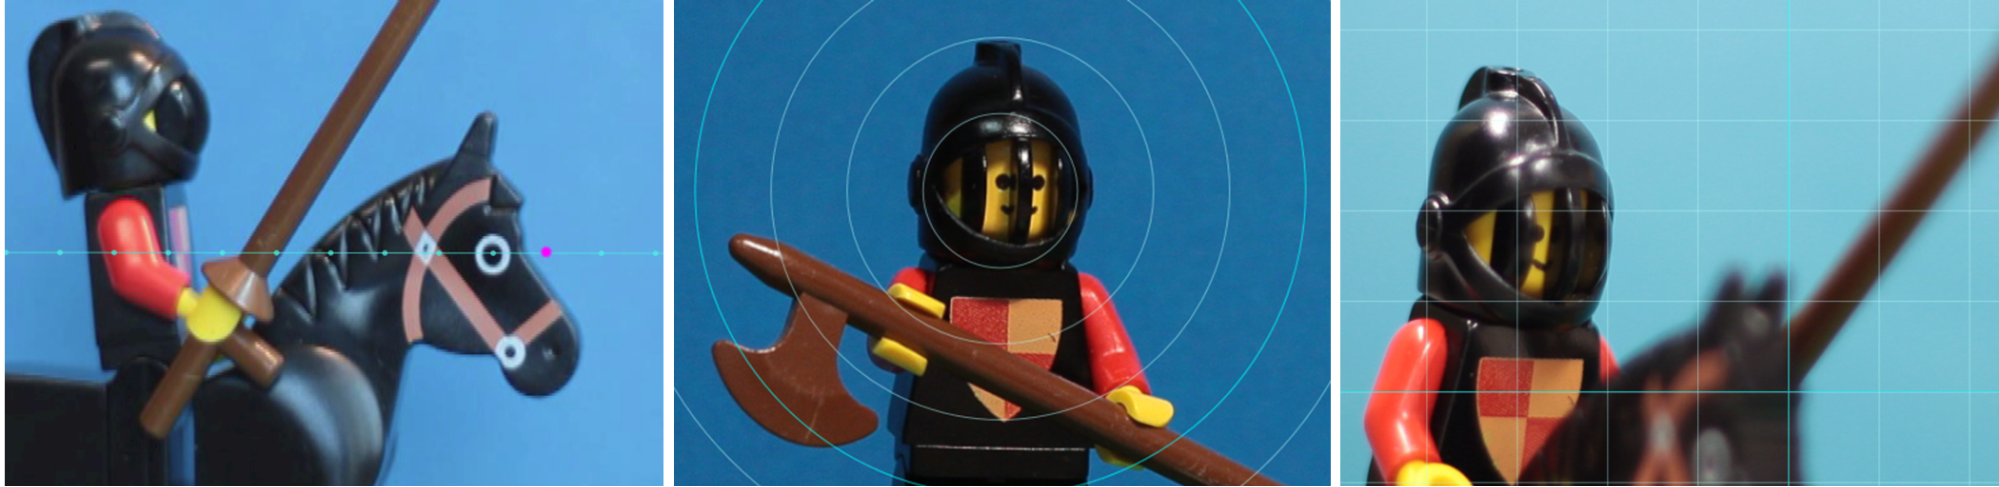
The interval for the nodes, grid lines, or circles is determined by the Time across setting. The value (seconds) determines how many suggested captures to make, as indicated by the space between intervals. You can use the alignment tools to create smooth even motion, or to help you gauge how much you need to move the subject to speed up or slow down the movement.
Exporting the animation
When you have added all the frames you want to the animation, click one of the following options:
• Export to Library: Converts the frames to an .axps file and imports both the .axps file and the collection of images to the Library. Similar to an .axp file, an .axps file is a project file that lets you easily reopen the project in the Stop Motion mode of the Importer so that you can continue to work on the project at another time. It references the project files.
• Edit in Timeline: Imports the frames to the Library and add the project to the Timeline (Edit mode) for further editing.
How to create a stop motion project in Pinnacle Studio
The steps below guide you through a basic workflow for a stop motion project. Before you start, it’s best to have all your materials ready and have your shooting area set up with the lighting you need. If you are using a DSLR that is supported in Pinnacle Studio, set your camera to Manual mode. A tripod is recommended.
1 If using an external camera to capture your stop motion project, ensure that the camera is plugged into your computer and is on, ready to capture photos. Set the camera to manual mode.
2 In Pinnacle Studio, click the Import button (to the right of the Author button). The Studio Importer window opens.
3 Click Stop Motion.
Supported cameras that are connected to the computer and switched on are listed below Stop Motion. Click a camera name and do one of the following:
• On your camera, manually choose the best settings for your stop motion scene and adjust the focus (can set the lens to MF to focus manually).
• If you have a compatible camera (most Canon and Nikon DSLRs are supported), in the control bar below the preview area, click the arrow beside the Camera button. In the DSLR Settings dialog box, choose your camera from the drop-list, and choose the settings for your camera, using the Preview screen as a guide. Make any adjustments you want and click OK. You can then focus the camera manually or set the lens to AF mode, and in Pinnacle Studio, enable Show Focus to display the onscreen controls. Click Auto Focus or Manual Focus. For Auto Focus, drag the rectangle to the area of focus. The camera will automatically adjust the focus. For Manual Focus, click the plus or minus symbol on the preview screen until the subject is in focus.
4 Choose your Project Settings, and if you want to change the default destination for your project files, in the Save to area, navigate the location you want.
5 When you know what kind of motion you want to make, you can choose from different types of alignment tools and set the Time across setting (value is time marked in seconds).
6 When you have the subject set up, click Capture Frame.
7 Move your subject the way you want, and continue capturing an image for each movement. If you are making a series of simple movements, you can set up Auto Capture.
8 When you are ready to review the frames, on the control bar, click the Play button to review the movie. To reactivate the Capture Frame button if you want to add more frames, click Video in the control bar.
9 When you are finished, click the Import to Library or Edit in Timeline button.
If you want to save the project without exporting to the Library, click the Save button beside Project Name. You can click the Open button (beside Save) to access the saved project.