Import sources
The actual selection of material to be imported takes place in the main area of the Importer. Each import source uses the main area somewhat differently.
The photos, music and video footage or projects you want to import may reside on a variety of device types and technologies. The supported import sources include:
• All types of auxiliary file-based storage media, including optical drives, memory cards and USB sticks (see Import from file). Click the My computer tab to select individual files for import from drives connected to the computer.
• Click Scan For Assets to import all files of specific types from a set of one or more directories.
• DV or HDV video cameras using an IEEE-1394 (FireWire) connection. See Import from DV or HDV camera (Capture Video). Devices are listed by name on the Import page by their device names (e.g. “DV Device”). Select the applicable one.
• Analog video cameras and recorders (see Import from analog sources). Any analog capture hardware on your system is listed by name (e.g. “Pinnacle Systems 710-USB”).
• DVD and Blu-ray discs. See Import from DVD or Blu-ray Disc.
• Digital still cameras. See Import from digital cameras.
Some sources are chosen from a sub-list of actual devices that appears when you click the main source entry.
Studio provides two special modes for importing single frames, rather than continuous footage. These modes are:
• Stop motion: Create an animated film by importing one frame at a time from a live video source. See Stop motion.
To access the controls, select the source, then click the more button  beside the source name. This opens the Input Levels window.
beside the source name. This opens the Input Levels window.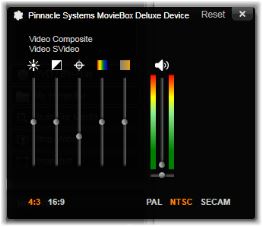
The Input Levels window lets you adjust a number of video and audio parameters. The Hue slider (fourth from left) is not used with PAL sources.
Although you can also adjust these levels with the appropriate correction from the Edit tab, setting them correctly for capture can save you from having to worry about color correction later on.
Setting your audio options correctly as you capture will help in achieving consistent volume levels and quality.
Particular capture devices may offer fewer options than are shown and discussed here. For instance, with hardware that doesn’t support stereo captures, an audio balance control will not appear.
Video: Choose the type of video you are going to digitize by clicking the appropriate source button (Composite or SVideo). The five sliders allow you to control the brightness (video gain), contrast (ratio of lightest to darkest), sharpness, hue and color saturation of the incoming video.
• The hue slider can be useful for correcting unwanted color shifts in NTSC material; it is not available when capturing from a PAL source.
• The saturation slider regulates the ‘color saturation’ – the amount of color – in the image. (An image with zero saturation has only black, white and gray tones.)
Audio: The sliders on the right side of the panel let you control the input level and stereo balance of the incoming audio.
Until you specify otherwise, the Importer uses the standard document folders for video, music and pictures within your Windows user account, and a default folder for your Pinnacle Studio projects.
The folders you choose for each asset type, whether default or custom, serve as base locations for your imported files. In order to manage your file-based assets effectively, you can also specify either a custom subfolder name or a method of automatically- generating a name based on either the current date or the creation date of the imported material.
For example, if you set your main video folder to “c:\vid”, and your subfolder naming method to “Current month”, any video you import will be transferred to a folder with a name like “c:\vid\2017-10”.
Fill-level indicator: This bar graph shows for each import destination how much room is left on the storage device. The first part of the bar represents space already occupied on the device. The colored extension shows how much room will be required by any currently-selected media files or project files awaiting import.
Note: If a destination device reaches 98 per cent full during import, the operation is halted at that point.
1 From the Import tab window, in the Save to area, click the folder icon beside the Save to box.
2 In the Choose folder window, navigate to the folder you want, and click OK.
3 In the Subfolder box, choose one of the following options:
• No subfolder: With this option, the files you import will be stored in the base folder.
• Custom: When you choose this option, an in-place edit box appears. Enter the name of the subfolder in which to store your next import or imports of the asset type.
• Today: Your imports will go to a subfolder named with the current date, in the format “2017-10-25”.
• Creation date: Each imported file will be stored in a subfolder named with the creation date of the asset, in the same format as above. When multiple assets are brought in as part of a single import operation, this may entail creating or updating multiple subfolders.
• Current month: This is the same as the Today option but without the day portion, e.g. “2017-10”.
Note: If you want to reset your folder and subfolder to the default settings, click the Reset to Default button.