Transitions
A transition is a specialized animated effect for easing – or emphasizing – the passage from one clip to the next. Fades, wipes and dissolves are common types of transition. Others are more exotic, and many employ sophisticated 3D geometry to calculate the animated sequences.
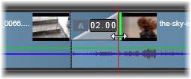
Creating a default fade-in transition by ‘folding back’ a clip’s upper left corner.
Two transitions can be assigned to any clip, one at each end. A clip newly created on the timeline has neither. When a new clip starts, it does so with a hard cut to the first frame. When it ends, it switches to the next clip (or black) with equal abruptness.
Pinnacle Studio offers a wide variety of transitions for softening, dressing up or dramatizing the change from one clip to another.
The most straightforward method of creating a transition is to click in the top left corner of the clip on the timeline and ‘fold back’ the corner. This creates a dissolve from the previous clip, if there is one, or a fade-in if there is not. The wider you make the fold, the longer it will take the transition to complete. Folding back the top right corner of the clip results in either a dissolve to the following clip or a fade-out.
More elaborate transitions can be added to the timeline from their section of the Library. When you find one you want, drag it onto one end or the other of a timeline clip. The length of the transition will be determined by the default duration defined in the Pinnacle Studio Control Panel > Project settings (one second by default). If the clip already has a transition at the chosen end, the new one replaces it. See Project settings for details.
If you are trying to add the transition to a clip which is shorter than the default transition length, the transition will not be applied. One way to avoid this problem is by making sure the dynamic length transitions button on the timeline toolbar is active. While it is, you can control the length of a new transition by dragging to the left or right as you place it on the clip. You will see the corner of the clip fold back as you drag. If the time-ruler is zoomed out enough, you will see the duration of the transition numerically displayed; clicking in this readout lets you edit it directly.
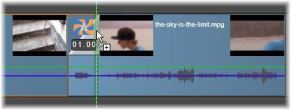
A transition dragged to a project’s timeline.
Another way to apply a transition uses the Send to timeline context menu command for assets in the Library, or the Send-to timeline button in the Player when in Source mode. The transition is added to the clip on the default track at the cut nearest the playhead.

Transitions can be added at the start or end of any clip.
The context menu of a clip on the timeline lets you add a transition by choosing either In transition > Add or Out transition > Add.
A fade-out transition is applied in ripple (or insert) mode, which creates an overlap by shifting the right-hand clip and all its neighbors somewhat to the left. This behavior saves the left-hand clip from having to be extended rightwards to create the transition, which might produce over-trimming. However, shifting the rightward clips causes a break in the synchronization with other tracks that may have to be worked around.
A fade-in transition is added in overwrite fashion. No synchronization issue will result, but over-trimming may be produced in the left-hand clip.
To invert the fade-in and fade-out behaviors, press the Alt key during dragging and trimming.
To apply a transition to multiple selected clips, hold down the Shift key while dragging a transition from the Library onto one of the selected clips. The position at which you drop the transition on that clip determines whether it will be placed at the beginning of each selected clip, or the end. The transition will not be applied to any clips that are shorter than the transition’s duration.
When the Dynamic length transition button is activated, the duration you drag out for the transition on the target clip is used for all the transitions created.
To keep tracks synchronized when inserting transitions in the out position, use this multiple-apply feature to add the same transition once on each track. Since each track will be affected in the same way, they will all remain synchronized.
When a fade-in follows a fade-out, the result is termed a ‘fade through black’. The left-hand clip fades all the way out, then the right-hand clip fades all the way in. It is not necessary to leave a one-frame gap between the clips.
Transitions can also be added by using the Editor panel by selecting a clip in the timeline, and in the Editor panel, clicking Transition In or Transition Out. Click a numbered transition category, and click a transition from the thumbnail bar. You can then choose the settings for the transition.
Choosing a transition in the Editor panel. The same transitions and controls apply to both in and out transitions.
The ripple transition command is especially useful for creating a quick slideshow from a set of still images, or a video pictorial from a set of short clips. Such a presentation is more interesting if you connect each pair of clips with a transition, which can be done quickly and easily by using ripple transition.
Begin with a set of clips on the timeline, then add a transition of the desired type to one of the clips. Select all the clips in the set, bring up the context menu on the clip with the transition, and choose the ripple transition command. This will apply the original transition to all the selected clips. If the original clip had both an In transition and an Out transition, you can choose either one to be rippled.
Any of the selected clips that already have a transition in place, or that are too short for the new transition, will not be altered.
To remove transitions from several clips at once, select the clips, right-click on one of them, and use the remove transitions command in the context menu. All the transitions, both in and out will be removed from the selected clips.
Select the transition you want and simply drag it onto an existing transition. This replaces the transition animation while retaining the original type (in or out) and duration.
Alternatively, you can choose Replace by on either the transition’s context menu or the clip’s context menu. You will be offered a selection of transitions to use.
The durations of transitions can be adjusted just like those of clips. Notice the adjustment pointer when the mouse is positioned near the vertical side of the transition rectangle. Use this to change the duration of your transition.
As usual, fade-out transitions use insert mode during adjustment, whereas fade-in is done in overwrite mode. Hold down Alt while adjusting to invert this behavior.
You can adjust a transition so that its duration is zero, effectively deleting it. Alternatively, use Transition > Remove on the transition’s context menu. Once again, ripple mode is used for fade- out, and overwrite for fade-in, with the Alt key available to reverse the default.
To set the duration of a transition numerically, click the duration field that appears when the mouse pointer is above the transition rectangle. (Zoom the timeline in to enlarge the screen width of the transition ‘fold’ if the field does not appear.) Clicking the field activates in-place editing, allowing you to enter a duration via the keyboard.
Find in Library: This command opens the Library Browser at the folder containing the transition.
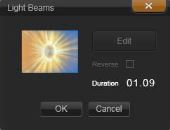
Edit: This command invokes a pop-up window, the basic transition editor, where the transition duration can be set.
If the transition is one that offers a custom editor for configuring special properties, the Edit button in the basic transition editor provides access.
A Reverse check box is available with some transitions for reversing the transition animation.
Basic transition editor
Copy: This command puts the transition on the Clipboard, together with its type (fade-in, fade-out) and its duration. These properties will be retained by the transition when pasted. It is therefore not possible to paste a fade-in as a fade-out or vice versa.
To paste the transition to a particular clip, select Paste on its context menu. To paste it to all selected clips, select Paste from the context menu of an empty timeline area or any selected clip; or press Ctrl+V.
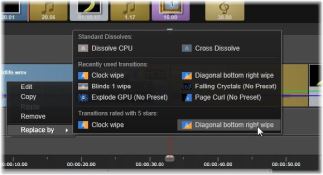
The Replace By submenu on the context menu for a transition pops up a convenient palette of standard, recently-used and 5-star transitions. This pop-up is also seen when transitions are added or replaced via a clip’s context menu.
Ripple: This command appears if more than one clip is selected. For more information, see Rippling transitions.
Remove: This command deletes a transition. Fade-in transitions are removed without further ado. Removing a fade-out transition causes clips to the right to be rippled rightwards by the duration of the transition. This can cause loss of synchronization with other tracks.
Replace by: A selection of transitions is offered: two standard dissolves, the six transitions most recently used, and all transitions with a 5-star rating.