Working with layer groups
The Title Editor Layer List allows you to group layers on either a temporary or a permanent basis.
To create a temporary group, you will use standard multiple selection techniques whether in the Edit Window or on the Layer List. You can then make changes, such as applying a Look, to all the members of the group simultaneously. The group remains whole only until you click another layer or an empty area of the Edit Window, whereupon the layers resume their individual existences. In a temporary group, the control frames of each member are all visible at once.
To create a permanent group, you first create a temporary group, then click the group button on the Layer List toolbar (or use the Group command from any member’s Grouping context submenu).
Once created, the group stays together until you explicitly disband it with the ungroup button or menu command, or by dragging the member layers out of the group in the Layer List. One further command, regroup, automatically reconstitutes the last group to have been ungrouped.
When a permanent group is selected, it has a shared control frame that encloses all its members. The control frames of the individual members are not visible.
Permanent groups have their own header entries and timeline track in the Layer List. The group header can be expanded or collapsed to reveal or hide the headers for the member layers. When the group is open, its member layers are indented with respect to the group header.
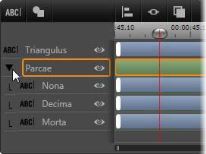
An ordinary layer and a group with three member layers in the Layer List. The timeline graphics show that Motions have been applied to the group itself and to one of its members. The mouse pointer is positioned to collapse the group, which would hide the names of the member layers.
Temporary groups and permanent groups respond differently to many commands as detailed below.
Note: Even when a layer belongs to a permanent group, it can still be individually selected, either in the Edit Window (unless the group itself is currently selected) or the Layer List. A member layer can even be added to a temporary group with other layers inside or outside the permanent one.
The first step in making a group is to select the multiple objects that will comprise it. In the Edit Window, this can be accomplished in two ways:
• By clicking and dragging with the mouse to mark out a selection rectangle (a ‘marquee’) that intersects all the objects you want to group.
• By clicking the first object you want to group, then Ctrl-clicking each of the others.
Another approach to multiple selection uses the Layer List. For more information, see Working with the Layer List.
Both temporary and permanent groups can be repositioned, resized and rotated.
To reposition any group, drag it to the new position as though it were an individual layer.
To rotate a permanent group, drag the rotation handle of the shared control frame. All members of the group revolve about their common center like planets revolving around the Sun.
To rotate a temporary group, drag the rotation handle of any member. All members of the group rotate about their own centers like planets rotating on their axes.
To resize a permanent group, drag any control point of the shared frame. The size of the whole group changes as though you were stretching a rubber sheet with all the layers painted on it.
To resize a temporary group, drag any control point of any member’s control frame. Each layer is affected individually, expanding or contracting in place about its own center.
In resizing operations on groups, as with individual layers, dragging by a corner control point preserves the aspect ratio of the layer, whereas dragging by a side control point allows the proportions to be altered.
Once a temporary group is selected, any property settings you make will affect every member to which the property is applicable:
• If you apply a Look, any text or shape member will receive it.
• If you add a Motion by right-clicking a Motion icon and choosing Add to selected layer(s), the result will be the same as if you had added it to each member individually.
• If you select a font, or change any other text styling attribute, every text member of the temporary group will be updated.
Except in the first case, permanent groups have their own rules for these operations:
• If you apply a Look, it works the same as with a temporary group: all text and shape layers in the group are affected.
• If you add a Motion to a permanent group, the group is treated for the purposes of animation as a single graphic object, without regard to the letters, words or lines its members may contain. However, the individual Motions of its members continue to run along with that of the group as a whole.
• Text stylings cannot be applied to a permanent group.
The final type of group operation, one that applies to temporary groups only, is provided by the group align button on the Layer List toolbar. The commands, of which there are three for horizontal and three for vertical alignment, affect all the members of the group except for the first selected, which sets the position for the others.