Working with the Layer List
The Layer List is a multitrack timeline very similar in conception to the timeline of the project itself in the Movie Editor or Disc Editor. Some operations, such as those to do with Motions, are particular to the Title Editor, however.
The procedures described here are all carried out in the header area of the Layer List.
Selecting layers
Clicking a header in the Layer List has the same effect as selecting the layer in the Edit Window (and vice versa). The layer name highlights, and the layer’s control frame appears. Multiple selection is also allowed, using the standard Windows mouse and keyboard combinations Shift-click (extend selection), Ctrl-click (toggle selection of one item), and Shift+Ctrl-click (extend selection from last item clicked). See Working with layer groups for information on how to use multiple selections.
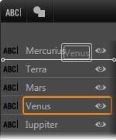
Layer names and renaming
When you create a new layer, the Title Editor gives it a default name based on the resource name or file name. Since the default names are often not very descriptive of the layer contents, it may be helpful in a title with a number of layers to give them custom names that make it easier to tell at a glance which name goes with which layer.
The name of a new text layer is the same as its default text (“Your text here”). Unless you give the layer a custom name, its default name will continue to match whatever text you type into the layer. Once you do rename a text layer, further changes to the text are no longer reflected in the layer name. The default behavior can be restored by setting a blank name, however.
To rename the primary layer, click its name. An edit field opens with the existing name selected. Type the new name, then press Enter or click outside the edit field to finish.
Reordering layers
As we saw in the topic Layer operations in the Edit Window, the position of a layer in the layer stack can be altered by means of commands on the Layer context submenu, or by keyboard shortcuts such as Ctrl+Plus (Layer > Bring to Front).
The Layer List offers a more direct approach: simply drag the layer header to a new position in the list. This is particularly handy in situations where overlapping layers make mouse selection difficult. As you drag the layer, an insertion line shows where the layer will appear in the list when dropped.
Using multiple selection (see Selecting layers) you can drag several layers at once to a new position.
A complex title can get crowded very quickly as you add layers to the composition, and Motions to the layers. The visibility button at the right-hand end of the layer header is handy for simplifying such situations.
Click the eye-shaped visibility button to temporarily remove a layer from the Edit Window. The layer’s information and settings are preserved, but you will be able to work on other layers for the time being without the hidden layer obscuring either your view or your mouse actions. Click again to restore the layer to visibility.
The controls and readouts on this header bar are in groups. From left to right:
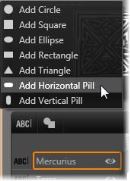
• The add text and add shape buttons allow you to create new ‘vector-based’ layers to which Looks from the Presets Selector can be applied. Clicking add text adds a new text layer with a default Look and caption. As a shortcut for add text, you can simply double-click any unused area of the Edit Window. Clicking add shape opens a pop-up menu from which you can select a particular shape as the contents of the new layer.
• Each of the align, group and order buttons opens a pop-up menu of commands that can affect multiple layers. These commands are covered under Working with layer groups.

• The 3D viewing mode switcher appears if you are editing a stereoscopic 3D title. Please see the 3D viewing mode switcher for information on the available formats.
• The transport buttons allow you to preview your title without leaving the Title Editor. From left to right, the functions of the buttons are: loop play, jump to start, go back one frame, play/pause, advance one frame, and jump to end.

The loop play button loops continuously once started; to halt it, click anywhere on the Edit Window, or click loop play again. As usual, pressing Space provides a convenient shortcut for stopping and starting playback.
• The System Volume and Mute button allows you to adjust the speaker volume of your system. It does not change the audio level of any clips on your timeline.
• The counters show the duration of the title and the current position of the Layer List timeline scrubber in the usual hours, minutes, seconds and frames format. For titles that come from your project rather than the Library, the scrubber position shown is relative to the start of your project’s timeline, not the start of the clip.

When a layer is created, its duration is set to the full span of the title of which it is a part. To delay the first appearance of a layer in the running title, or to banish one layer while continuing others, drag the ends of the layer along the timeline in the same fashion as clip editing on the timeline of your project.
A title is like a stage on which the layers are actors who come on for their big scene and then depart. Trimming the layers in the Layer List timeline allows you to control precisely the timing of their entrances and exits.
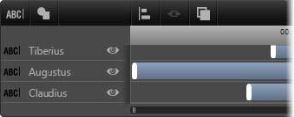
Up to three Motions – one of each type – are allowed to each layer. These are also displayed on the timeline, where their durations too can be adjusted. Enter and exit Motions are each anchored to their respective ends of the layer lifespan, but the end of the enter Motion and the start of the exit Motion can be freely edited with the mouse.
If the layer has an emphasis Motion, it occupies whatever unused duration remains (up to the whole length of the title).

Three layers with Motions. The top layer has only an Emphasis Motion (solid line), which therefore uses the full duration. The bottom layer has Enter and Exit Motions, and a static interval between them. The center layer has Motions of all three types. The Enter Motion is being trimmed (note the horizontal arrow cursor); as its length changes, the Emphasis Motion self-adjusts to consume fully any unused time.
To replace one of the Motions used by a layer, simply add the new Motion as usual: an existing one of the same type will be overwritten.
To delete a Motion without replacing it, select the layer and click the small ‘x’ in the center of the Motion’s timeline graph.