Title Editor components
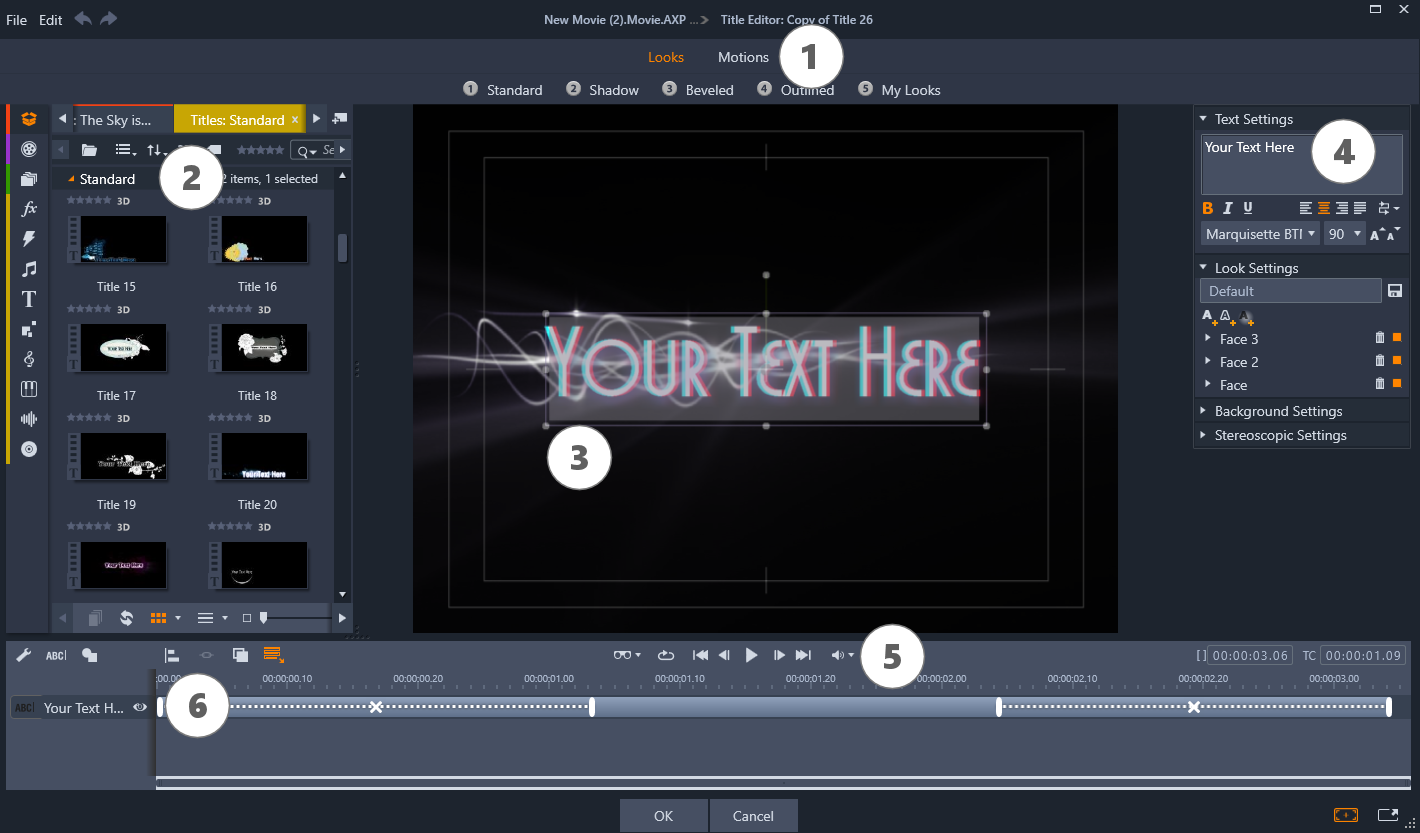
Areas of the Title Editor: 1. Presets Selector; 2. Library panel; 3. Edit Window; 4. Settings panel; 5. Toolbar; 6. Layer List
These are the main areas of the Title Editor display, numbered as in the illustration above:
1 The Presets Selector provides tabs for Look and Motion presets, with the presets organized by style within each tab. A Look is a visual styling of a text or shape layer in your title; a Motion is an animation routine that can be assigned to any layer but is most often applied to text. See Preset Looks and Preset Motions for further information.
Hover your mouse over any preset to see how it will affect your title. A single click applies the preset to the current layer. After being applied, Looks can be customized using the Settings panel.
2 The Library provides resources for building your titles. The tabs across the top provide access to all available media and content. For information about the Library panel, see The Library.
3 The Edit Window is your main work area when authoring or editing a title. It provides a scrubbable preview of your title with hands-on editing. See The Edit window for details.
4 The Settings panel has separate collapsible subs for each of three settings categories: Text settings, governing the style and size of text captions; Look settings, for the configuration of faces, edges and shadows; and Background settings, which pertain to the title’s background layer.
5 The Toolbar has four control groups. From left to right: the add text and add shape tools; a set of layer manipulation controls; a full set of transport controls including a loop button; and a pair of counter readouts showing the duration of the title and the current playback position.
6 The Layer List: Each graphical or textual element constitutes a layer in the title, which is a stack of such layers. The opaque parts of each layer obscure the layers below; the bottommost layer can obscure only the background.
In addition to listing each layer by name, the Layer List includes an animation timeline showing the time span during which each layer is active, and the Motions that have been assigned to it. These properties can be adjusted by dragging.
The process of building up an image in layers is called ‘compositing’. Because the information in each layer is maintained separately, to be combined only when the image is output, it is possible to return to the composition at any time and add new layers, and to adjust, reorder, remove or replace existing ones.
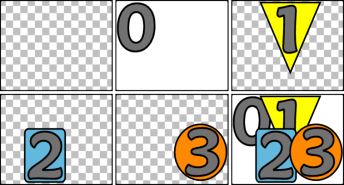
Building up an image in layers starting with an empty frame (top left). The checkerboard pattern indicates transparency. Although backgrounds can have transparent or translucent areas, here we add an opaque background (0) for clarity, followed by successive layers with some opaque content (1, 2, 3). In the final composition (bottom right), upper layers obscure those below.