Import from DV or HDV camera (Capture Video)
To prepare for importing digital video, switch on your DV or HDV device in play mode, click Capture Video, and select your device in the Source drop-down menu above the preview area.
You will also need to make sure that your destination folder, compression presets, and other options are set up in the other panels the way you want them. (See Import sources.)
The video currently playing on the source device should now be visible in the preview area of the display. Along the right edge of the video preview is a scale showing the moment- by-moment audio level.

When a DV or HDV source is selected, the central area of the Importer provides controls for previewing and importing the taped material.
Below the preview image is a row of controls for automating capture by setting mark-in and mark-out points. For more information, see Recording video and audio.
Another row of controls, the transport bar, serves as your navigation console for the source device.

The transport bar for DV and HDV import, with (from left) jog controls and timecode readout, transport buttons, a shuttle control, and an audio button with a pop-out slider for controlling the preview volume.
The current timecode indicator 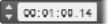 shows your playback position according to the timecode recorded onto the tape when it was shot. The four fields represent hours, minutes, seconds and frames respectively. To the left of the indicator is a pair of arrow buttons; use these to jog the position one frame back or frame forward at a time.
shows your playback position according to the timecode recorded onto the tape when it was shot. The four fields represent hours, minutes, seconds and frames respectively. To the left of the indicator is a pair of arrow buttons; use these to jog the position one frame back or frame forward at a time.From left to right, the transport buttons  are play/pause, stop, rewind and fast forward. These buttons relay commands to your camera. Using them is equivalent to using the camera’s onboard controls, but typically more convenient.
are play/pause, stop, rewind and fast forward. These buttons relay commands to your camera. Using them is equivalent to using the camera’s onboard controls, but typically more convenient.Drag the orange needle on the shuttle control 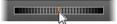 to the left or right to change the playback position in the reverse and forward directions respectively. The motor speed increases as you drag the needle further off center. When you release the needle, it homes to the center position and pauses playback.
to the left or right to change the playback position in the reverse and forward directions respectively. The motor speed increases as you drag the needle further off center. When you release the needle, it homes to the center position and pauses playback.Set preview volume: To set the playback volume for previewing, hover the mouse pointer in the area of the audio/mute button in the bottom bar of the file browser. A volume slider will appear beside the button. Drag the knob up and down to control the volume. Click the audio/mute button itself to toggle audio muting.

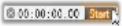
Mark-in, mark-out: The mark in and mark out timecode fields above the ends of the transport bar indicate the planned starting point and ending point of a video capture.
Note: DV and HDV sources are also suitable for snapshots.
The Importer supports two approaches to selecting a range of video to be imported.
In the manual approach, you simply watch the preview playback and press Start Capture at the start of the desired footage. When you reach the end of the segment, press Stop Capture. If you have continuous timecode on the source footage, and have set Stop at tape end to ‘Yes’ in the Mode panel, you can walk away and leave the Importer to switch off when the input is exhausted.
The automatic method of capture is good for setting the endpoints of your capture (the “mark-in” and “mark-out”) points with single- frame precision, and for unattended importing that should halt before the end of the recorded material.
Sometimes you may want to use set the mark-in time and leave mark-out blank. When you click Start Capture the Importer will locate your start time then capture until you tell it to stop (or at tape end).
You can also set a mark-out time and leave the mark-in time blank. When you click Start Capture import will begin immediately, and end automatically at the mark-out point. Entering a duration and entering a mark-out time are equivalent. Whichever you specify, the Importer calculates and displays the other one automatically.
Note: Before starting the import operation, verify that the settings in the Settings area and other settings (see Import sources) have been configured correctly.
1 Make sure that the mark-in and mark-out points are not set. If needed, use the button associated with the field to clear it with one click.
2 Manually start playback of the source tape before the desired starting point of the capture.
3 Click the Start Capture button when the starting point is reached. The button caption changes to Stop Capture.
4 At the end of the segment click the button again. The captured material is stored in the Library.
5 Manually halt playback (unless automatic shutoff is in effect as noted above).
1 Use the time counter controls to set the mark-in and mark-out values – the start and end points of the desired footage.
To set the mark-in point, either enter a value directly into the start field, or navigate to the desired point and click the Start button. A similar approach can be used to set the mark-out point.
2 Click Start Capture. Studio positions the source device to the mark-in point and automatically begins recording.
3 When the mark-out point is reached, import is terminated and the source device is stopped.
4 The captured material is stored in the Library.