Correcting timeline media
Corrections made to content in the timeline are saved with the project (and therefore apply to the project only).
To remove corrections from media, select the clip in the timeline, and in the Editor panel, open the corrections you applied and from the Select preset dropdown, choose Default.
For details on correcting particular media, please see Correcting photos; Correcting video; or Correcting audio.
The Navigator strip at the bottom of all media editor windows gives you an opportunity to load other Library items or other timeline clips.
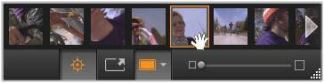
When called from the Library, the Navigator at the bottom of the media editor accesses other assets displayed in the Library Browser.
The current item is highlighted. You can switch to editing a different item by clicking a different element in the Navigator, using the arrows at right and left to assist scrolling if required. When you do so, any changes made to the currently-loaded item are automatically saved, as though you had clicked the OK button.
You can hide the Navigator by clicking its button  at the bottom of the media editor window.
at the bottom of the media editor window.Sharing the bottom toolbar with the Navigator button is a series of view-related buttons.
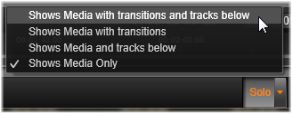
The Solo button gives access to a menu of options for previewing underlying tracks in the media editor as well as the current one, and for including the clip’s transitions, if any, in the preview.
 Solo: This button is available only if the media editor is selected from the timeline. While it is highlighted, the current clip in the Navigator is shown in isolation when previewed, without taking into account the effect of any clips either above or below it on the timeline. While the button is not highlighted, all timeline tracks can contribute to the preview.
 Before-and-after view: This button appears for photo media only. For details, see Before-and-after.
 Full screen: When active, this button scales the preview image to the size of the current monitor and removes other tools from view. To exit the full screen mode, press Esc, or use the close (X) button at the top right of the window. The full-screen view includes its own small overlay panel of transport controls.
 Preview zoom options: Fit window adjusts the size of the preview so that the height and width of the image do not exceed the available space even when all tools are open. Set to actual size displays the image at the original size of the source.
Zoom: The scroll bar at the far right of the toolbar provides continuous scaling of the preview image.
The preview image can be dragged with the mouse anywhere within the working area. This is useful for scanning the image while it is zoomed in. The wave visualization in the Audio Editor is not draggable, however.
The Info button at the bottom left of any media editor opens a window with information about the current file.

The Caption field, which is available only when you invoke the media editor from the Library, allows you to rename the current asset.
When you select an effect or tool that has adjustable settings, a panel appears in the upper-right section of the window. Named presets are available in the Select preset dropdown menu near the top of the panel; these provide prepared combinations of settings that you can adapt or use directly.
Setting numeric values: Numeric settings fields have a gray slider bar within a darker gray field. Click once within this field to put it into numeric input mode, where you can type the desired value for the parameter. Alternatively, drag the slider bar to the left or right using the mouse. Double-clicking restores the default value.
Comparing parameter sets: A highlighted (orange) dot appears to the right of the field when the value of a setting is changed from the default. Thereafter, clicking the dot toggles between the default and the most recent non-default values. The dot to the right of the effect or correction name toggles between the default and custom values of all parameters.
Linked parameters: Some parameters are configured to change in lock-step. The presence of a lock symbol indicates this. Click the symbol to toggle the link.

The settings panel lets you adjust the available settings for a correction or effect. Here the settings for the Enhance group of photo corrections are displayed.