Video tools
These tools are located on the toolbar below the Video Editor preview. Just below the tools is a time-ruler with a scrubber for moving through the video. At the left are the marker controls. For more information, see Markers.
The remaining controls are devoted to previewing and trimming the media. Many of the controls are also to be found in the Audio Editor. Unless otherwise noted, the descriptions here apply to both. (Please see Editing audio, for further information.)
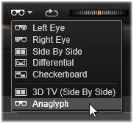
Stereoscopic 3D: The icon and dropdown arrow to the left of the loop play button let you choose amongst several modes for viewing 3D material. The icon has a different appearance for each mode.
If your video is in 3D, but the dropdown arrow does not appear, go to Adjustments to choose the correct 3D setting. See Adjustments for more information.
Shuttle: The shuttle wheel provides smooth, bidirectional control over a range of speeds when browsing video or audio. Both media types can be viewed at a reduced speed. Shortcuts J (reverse), K (pause), L (forward), and each of these in combination with the Shift key (for slow play), allow easy scrubbing and shuttling from the keyboard also.
Transport controls: The oval arrow icon activates looping playback. The remaining controls are (from left to right): Jump backward, Frame backward, Play, Frame forward, Jump forward.
Audio monitor: The loudspeaker icon sets the system playback volume but does not affect the recorded audio level. Click once on the loudspeaker to mute, or click on the slider to the right of the icon to adjust monitoring volume. To set the playback level of the clip itself, use the channel mixer. See Channel mixer.
Time-code displays: The left field indicates the duration of the media as trimmed. The right field displays the current play position. For a Library asset, the play position is relative to the start of the media. For a timeline clip, the play position within the project is given.
Setting the position numerically: Click the right-hand time-code field for the position and enter a position in ‘hh:mm:ss.xxx’ format. When you press Enter, the playhead jumps to the specified location if that position is present on the clip. Press Esc to undo the change and exit the input mode.
Asset trimming: For Library assets, the orange calipers at either end of the time-ruler let you choose your own entry and exit points for playback. Doing so establishes the clip endpoints when the asset is used in a project.
Ruler: The time-ruler displays a scale whose gradations depend on the current zoom factor. If you click anywhere on this ruler, the playhead (see below) jumps to this position.
Playhead: This red line, with its handle the scrubber, is synchronized with the image currently displayed (for video) and also with the red line shown on the waveform display (for audio). You can position it arbitrarily by clicking and dragging the scrubber, or by dragging within the waveform.
Scroll bar and zoom: By dragging the double lines at the end of the scroll bar to the right and left, you change the zoom level of the display. When the bar becomes smaller, the scroll bar can be moved back and forth as a whole, enabling you to zoom into an audio clip’s waveform or scrub with extra precision. Double-click the scroll bar to return it to the full width of the clip. You can also zoom in and out by dragging left and right on the ruler area.
Markers are visual reference points that can be set on the time-ruler to identify changes of scene or other editing cues.
The Marker
Setting and moving markers: Position the playhead at the location where the marker should be set. Click the toggle marker button at the left of the toolbar, or press M. Only one marker may be set per frame.
To move a marker: Ctrl-click and drag left or right.
Deleting the marker: Click the marker to move the playhead to that position, then either press M or click the toggle marker button.
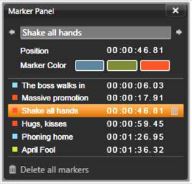
You can also delete markers using the list on the Marker panel, which opens when you double-click a marker on the ruler, or click the down-arrow next to the toggle marker button.
The Marker panel shows the markers that have been set within the media currently on view, in ascending order, with color code, name, and position. Most of the available commands apply to the currently- selected marker. The exception is the Delete all markers button at the bottom of the panel.
Clicking a marker in the list selects it for editing. At the same time, the playhead jumps to the marker position.
Edit name: The name field lets you enter a distinctive name for the currently-selected marker if desired. The left and right arrows beside the name provide another way of moving through the marker list.
Position: Edit the position of a marker directly here as time-code.
Marker color: Set the color of the current marker (and markers subsequently created), by clicking one of the available color buttons.
Trashcan: The trashcan icon on each row of the marker list lets you delete individual markers.